Showing posts with label BYOB. Show all posts

Monday, September 5, 2011

It's a beautiful day in the neighborhood


This has been the first pleasant day we've had in months.  Breezy and dry, with 70s this morning and 80s this afternoon.  There's only one problem--it's dry.  Way too dry.  We had almost no rain in July, none at all in August, and none so far this month.  It's crazy--I've read how much rain has been falling in Louisiana and the southeast US from tropical storm Lee, and all we've gotten from it has been wind.  There won't be any grilling around here for Labor Day, at least there better not be, with all the wildfires burning around the Austin area.  (Thankfully, none are near us at the moment, but we know people close to the affected areas.)

Still, parents with the day off from work and kids with the day off from school flocked to the park this morning to enjoy the lovely weather.  We were among them.  We're lucky to have some really great places to play, like the playscape at San Gabriel park.  The girls got to run around like maniacs for about an hour, and I got to sit in the shade and read.  Well, and take some pictures. =)  Then it was home for lunch and naps.  I love extra days off. 


I did some baking yesterday.  I'm starting to get back into the bread baking mood, now that we're actually seeing some days below 100º. (The Austin area has had 79 days of 100º+ so far, and there's still a chance we could have more.)  I even revived Ernie, my sourdough starter, and have baked sourdough bread two weekends in a row.  Last weekend, I baked Pain au Levain from one of my favorite books, Artisan Breads Every Day.  I really like that recipe, but I wanted to make something quicker this time.  I turned to one of my trusted resources, King Arthur Flour, to see what I could come up with.


I have to say, I really like the recent redesign that KAF did on their recipe section.  For one thing, it's much more iPad-friendly.  I was also happy to see that in addition to weights in ounces, many recipes now give the option for grams as well.  It's an easy conversion if I have to do it myself, but it's nice to save a step.  I do have to wonder, though, why it will tell me that a tablespoon of sugar is 14 grams, but not give me a weight for 2 1/2 teaspoons of salt.  Oh well, it's not like it's that hard for me to figure out for myself. =)  

There's a section of sourdough recipes, with all kinds of interesting stuff (including pizza and waffles and even chocolate cake).  I settled on the recipe for Rustic Sourdough Bread.  There is a handy blog post to go along with it, showing how the recipe can be adjusted to give different results depending on how much time you have on your hands.  I went for the quicker version, which still has nice flavor while only taking a few hours.  I fed Ernie Saturday night, so I had a nice active starter ready to go Sunday morning.  I did have to do some math, though.  I keep a firm starter, with a hydration of about 66%.  That means that for every 100 grams of flour, it has 66 grams of water.  The recipe has a link to KAF's fresh starter, and the instructions for it led me to believe that it's a 100% hydration starter, meaning that it has equal amounts of water and flour.  So I had to figure out how much total water and flour were in the original recipe (totaling the amounts from the starter and what is added later).  I decided to keep the amount of starter constant, so I had to figure out how much water and flour were in the same amount of my starter (the recipe calls for about 225 grams of starter) and adjust the additional water and flour accordingly.  This is where I love my notebook.  I didn't want to write it out here, so the photo below shows my calculations and notes for this recipe:


The verdict? Well, we've managed to polish off the first loaf already.  Samples yesterday, toast for breakfast today, sandwiches for lunch.  The other loaf got sliced and went in the freezer for B's lunches this week (and maybe some for me, too).  The flavor is nice--a bit of tang, but not too sour.  It was a hit with B, which is good, since she can be picky about bread.  I'll definitely be making this recipe again--I love how easy it is, as long as I remember to feed my starter first.

If you'd like to try this bread for yourself, you can find the recipe here at KAF.  If you don't have a starter of your own, there are a number of great tutorials on the web, including this one from my friend Phyl.  I made mine using the steps in Artisan Breads Every Day, and posted about it here.  For more yummy and beautiful breads, be sure to check out the collection each week at Yeastspotting


Wednesday, August 24, 2011

The great debate


Welcome to Wednesday with Dorie! (Oops.)  The first couple days of the school year have been a bit hectic and tiring for everyone, so some things are running a little behind.  No homework yet for B, but other things have been worrying her.  She is -so- my child.  What 3rd grader worries about flunking on the second day of school?  That would be my 3rd grader.  She worries so much, and takes everything so seriously.  Gee, I wonder where she got that?  But is it nature or nurture?  I've always been the same way, so is it in the genes?  Or am I causing her to be this way, mainly because my parents influenced me the same way?  Either way, I've been there, so I'm trying to do what I can to relieve some of her anxiety.  Which is tricky, since I'm also trying not to let my own anxiety show, about whether I'm being a good parent--since I have a 3rd grader who worries about flunking on the second day of school... *sigh*  No one ever said this parenting thing was going to be easy.


Fortunately, some things are easier than they look.  Like this brioche.  Though it is another one of those things you can question--is it bread, or is it pastry?  Margaret of Tea and Scones picked this recipe for us to make for this week's Tuesdays with Dorie.  You hear the word brioche, and immediately think, "French! Complicated!" (or is that just me?)  I know I felt rather intimidated by it the first time I made it, back in March of 2008 (wow, has it been that long?), when we made the Brioche Raisin Snails.  But even if you're kind of scared of yeast, it really doesn't take a lot of skill--just patience, and hopefully a stand mixer (or food processor, if you're like my friend Nancy).  Some of the bread I make is dense enough that I forego the mixer--it's not getting any younger, and I don't want to overtax it.  But brioche is a soft, sticky dough, so it doesn't cause any problems.  Despite what Dorie says, mine never really pulled away from the sides of the bowl.  In fact, you may wonder how this buttery blob could ever turn into bread.  The answer?  Time.  And some serious chilling before shaping.  


I mostly followed the recipe as written.  I used instant yeast, rather than active dry, so I reduced the amount.  I actually used some of my SAF gold yeast, which is designed to work better in a sweeter, rich dough.  (I ended up using 10 grams, or about 3 teaspoons.)  I wanted to use my "Nancy pan," so I changed the shaping a bit.  I took half the dough, which was about 600 grams.  (I froze the other half.)  I divided it into 4 portions of about 150 grams each, and formed each piece into a ball, rather than a log.  I put them in the pan, and covered it with plastic wrap.  I let it rise until the dough was almost to the top of the pan.  I skipped the egg wash, but about 15 minutes in the top of the loaf was getting rather brown, so I tented it with foil.  I ended up baking the loaf for 30 minutes, at which point the internal temperature was about 190ºF.


The verdict?  I love pastries, and brioche really isn't far off.  My favorite part is the crunchy, buttery crust.  I'm happy with how the pan worked for this loaf--the small slices provide nice portion control. =) So far, I've just been snacking on the brioche, making little jam sandwiches.  Yum.

If you'd like to try this one for yourself, you can head over to Margaret's blog for the recipe.  And be sure to check out the Links to see how everyone else did this week.  I leave you with pictures from the first day of school.  G doesn't start kindergarten til next year, but of course we had to take her picture, too. 

Monday, May 9, 2011

Let's do the twist


I hope all you moms out there had a great Mother's Day.  Amazingly, I got to stay in bed all the way to 7:30am!  It's nice that my girls are now old enough to fend for themselves for a little while in the morning.  They were camped out in Brianna's room, waiting for me to get up.  Unlike last year, they apparently hadn't come up with any sort of plan to make me breakfast.  That's just as well, since last year they neglected to let my husband Jamie in on the plan until the morning of Mother's Day.  =)  Being of sound mind (sometimes, anyway), I had already come up with my own plan anyway, and done most of the work the night before.


A few weeks ago I was at the library with the girls, and decided to wander through the cookbook section.  I'm not as fortunate as my friend Tracey; my library doesn't have nearly as many as hers does, especially newer ones.  But I stumbled across an older book (2008, so not -that- old) that caught my eye.  It was The Sweeter Side of Amy's Bread.  I had heard of it because Tracey posted a recipe from it a little while back.  Joanne Chang also mentions Amy's Bread in her book Flour, which is one of my current favorite books.  It turns out that the books are similar--home recipes for bakery favorites.  I like the writing style of both, which is what usually leads me to purchase a cookbook.

Once I had the book at home, I read through the whole thing.  Am I the only one who likes to read cookbooks for fun?  I think the people at work have finally gotten used to me doing it on my lunch breaks. =)  I made mental notes of recipes that I wanted to try sooner rather than later, and the one at the top of my list was the Cinnamon Raisin Twists.  They're made from a sweetened dough that contains cinnamon and raisins.  The dough is layered with some butter and brown sugar and then cut into strips that are twisted before baking.  The recipe can be completed in one day, but I broke it up into two.  I completed the recipe up through shaping the twists, but rather than doing the final rise, I stuck the pan in the fridge for the night.  (The recipe calls for two sheet pans for baking the twists, but I crammed them onto one pan since I couldn't fit two in the fridge.)  On Sunday morning, I took the pan out and put it into my slightly warmed oven so that the final proof wouldn't take too long (it ended up being about an hour since I started with cold dough).  Once the twists were puffy, I took them out, preheated the oven, and baked them for about 25 minutes.  


The verdict?  These are fantastic!  Sort of cinnamon roll meets raisin bread.  The only problem I had was that they were too big for any of the small plates we have. =)  Everyone here loved them.  I ended up taking about half of the pan to work today and they were well-received there as well.

I'm definitely going to make these again.  The book also has recipes for some savory versions.  I have plenty of cookbooks already, but now this one is going to the top of my wish list.  Unfortunately, my library doesn't have the first Amy's Bread book; I'll have to see if I can find a copy at one of our local bookstores so I can see if I need that one, too.  

For lots of other yummy yeasted treats, be sure to check out Yeastspotting and the BYOB bakers.  


Monday, April 13, 2009

Monkeying around


I'm not entirely sure why, but Gillian really loves monkeys.  The first sign was when she started to carry around a small stuffed Curious George that belongs to Brianna.  Brianna wasn't exactly thrilled with that, so fortunately Santa Claus brought Gillian a Curious George of her own (yay for Kohl's Cares for Kids).  We have a couple of monkey cups that she's quite fond of as well, often arguing with Brianna about who will get which one.  They have a carpet with animals on it at her daycare, and she claimed the monkey as her spot to sit during circle time.  She likes to sing about the Five Little Monkeys (jumping on the bed and swinging in the trees, both).  And it's quite entertaining to ask her what monkeys say--"Ooh, ooh, aah, aah!"  

And then there's the fact that she acts like a monkey.  She was quicker than Brianna was to start climbing into and out of things.  Like the playpen, and then her crib.  It's still pretty funny to watch her climbing over the side, which stays lowered all the time now--she's quite capable of scaling it when it's up, which is rather scary to watch.  We have a very difficult time convincing her not to climb over the arms of chairs and the couch, not to mention actually getting her to stop standing on the furniture.  Brianna still wins for climbing the front of the refrigerator, though... =)

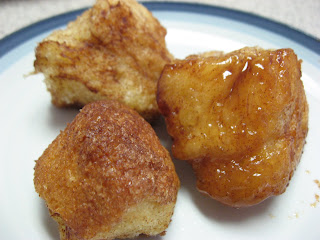
So with all the monkey business around here, it's kind of surprising that it took me this long to get around to making another monkey item--monkey bread.  What made me decide to make some was a great post about Monkey Bread Muffins over at Two Peas and Their Pod.  I'm not really sure why it's called monkey bread, but boy, is it tasty.  =)  Sort of like cinnamon rolls, but with the cinnamon on the outside.  And fun to eat, especially with kids, since you get to pull it apart.  I was home by myself when I decided to make some, but it would be a great thing to make with kids, as well--they'd have a lot of fun rolling the dough in the butter and sugar.  

I used the bread dough that I already had in my fridge, which was a result of my monkeying around with another Artisan Bread in Five recipe.  I was looking for dough that would make a good sandwich loaf.  The recipe for Buttermilk Bread caught my eye, and it was something I hadn't tried yet.  It's not that different from the basic dough, but you substitute buttermilk for some of the water and add a bit of sugar, both of which make for a more tender crumb.  However, I started to get everything together to make the dough and then discovered that I didn't actually have buttermilk.  I don't always have it around, since I have a bad habit of opening a pint container, using about half a cup and then forgetting that I have the rest.  What I did have, though, was plain yogurt.  I figured it was worth a shot!  

The verdict?  The dough turned out great.  I liked the bit of tang in the finished loaves of bread.  And it worked quite nicely for the monkey bread--not too chewy.  And not too sweet, which was good since there was plenty of sugar on the outside.  I will definitely make both the plain loaves and the monkey bread again.  I'd like to try it with part whole wheat, too.

For the full bread method, head over to the Artisan Bread in Five website, or check out a copy of the book.  For lots of other great bread, be sure to check out the BYOB roundups.  And I'm submitting this to Yeastspotting (this week hosted by Zorra) as well, another wonderful source of inspiration.


Monkey bread

4 tablespoons unsalted butter, melted
1/4 cup packed brown sugar
1/4 cup granulated sugar
1 1/2 teaspoons cinnamon
20 ounces bread dough (see below for what I used)

Spray an 8 1/2 by 4 1/2 inch loaf pan (I use Pyrex) with baking spray.  Mix the sugars and cinnamon together in a small bowl.  Using a bench scraper, cut the dough into small pieces about the size of a walnut.  Dip each piece of dough in the melted butter, roll it in the sugar mixture, and then place it in the loaf pan.  If you have any butter or sugar left, drizzle/sprinkle it over the top of the dough balls in the pan. Don't pack the dough balls in too tightly.  

Loosely cover the pan with plastic wrap and let the dough rise at room temperature until the pan is about three-quarters of the way full.  While the dough is rising, preheat your oven to 350 degrees F.  Place the pan on a rack in the middle of the oven and bake for about 50 minutes.  The dough will fill the pan and be nicely browned on top.  The center of the loaf should be 190-200 degrees F when done.  Let rest in the pan for about 5 minutes, and then invert the bread onto a serving platter.


Yogurt bread dough
(adapted from ABin5)

18 ounces room temperature water (I used spring water since my tap water is extremely hard)
8 ounces whole milk yogurt (Brown Cow)
2 pounds unbleached all-purpose flour (King Arthur)
1 1/2 tablespoons granulated sugar
4 teaspoons kosher salt
4 teaspoons instant yeast

Place the water in the bowl of a standing mixer.  Stir in the yogurt.  Add the dry ingredients to the bowl.  Using the paddle attachment, mix on low speed until the dough starts to come together.  Switch to the dough hook and mix on low speed for one minute.  Transfer the dough to a large (5-6 quart) covered bucket.  Let it rise at room temperature for about two hours, then refrigerate.  Use the dough within seven days.


Sunday, March 29, 2009

Mellow yellow


So far, I've been doing quite well with my goal of baking all my own bread.  Unfortunately, I haven't been doing as good a job of blogging about it.  One thing I may try for April is an idea that I love from Sandy of At the Baker's Bench (our lovely BYOB moderator).  She keeps a running baking log for the month on the sidebar of her blog, complete with links to blog entries about some of the items.  

The thing that has been keeping me going is still Artisan Bread in Five Minutes a Day.  It really helps with the daily bread need.  I've tried a number of the dough recipes in the book (a couple of which are still sitting as drafts that I haven't finished...) and have started playing around a bit as well.  One of the more recent recipes I tried was for bagel dough.  It's similar to the basic dough, but made with bread flour and a little sugar.  It was a bit stickier and harder to handle than my usual bagel dough.  I'm still not sure how I like it, but it is certainly convenient.  What I really liked, though was the loaf of bread I made from that dough.  It was fantastic--wonderful crust (the sugar in the dough helped with the browning, I'm sure) and really tasty.  I have to admit, much as I've been trying to be good and add whole wheat to my bread, the bread made with just white flour was so darn good! =)  (I know, all things in moderation.)


Because of the bread flour, the dough was a bit stiffer and easier to work with than the basic dough.  It didn't result in really big holes in the crumb of the loaves, but it still had a really nice texture.  For the next batch, I decided to play around a bit more.  I keep some semolina on hand because I like it in pizza dough, so I used it in place of some of the bread flour.  There is a recipe in the book for a semolina dough that uses about half semolina flour and half all-purpose.  I didn't think I should add that much, though, since all I have easy access to is coarse semolina, not the really fine durum semolina.  (I really have to do that order from King Arthur one of these days...)  So I went with about a cup of the semolina.  

When I first started making ABin5 bread, I went with the 16 ounce boules recommended at the beginning of the book.  For our needs, though, I find that a batard works well.  And we go through the small loaves very quickly, so my standard loaf is now made from 24 ounces of dough.  I preheat the oven and my baking stone (on the bottom rack) for about 20 minutes at 450 degrees F.  Then I bake with steam (often using this cool idea from Zoe, using a disposable pan to cover) for 10 minutes, then bake the loaf for an additional 25 minutes.  


The verdict?  I really liked the way this variation turned out.  The semolina was enough to give the crumb of the loaf a very pale yellow color and a nice flavor.  The crust was excellent.  Fresh bread is a hit with everyone in this house. =)  And Brianna and Gillian were happy to eat some of the older bread as French toast. 

Be sure to check out lots of other wonderful bread creations at Yeastspotting

Semolina Dough

26 ounces room temperature water (I use bottled spring water since my tap water is very hard)
5 ounces semolina
27 ounces bread flour (King Arthur)
1 1/2 tablespoons granulated sugar
4 teaspoons kosher salt
4 teaspoons instant yeast

Place the water in the bowl of a standing mixer.  Add the remaining ingredients to the bowl.  Using the paddle attachment, mix at low speed until the dough starts to come together into a ball.  Switch to the dough hook and mix at low speed about one minute.  Transfer the dough to a 6-quart container and let rise at room temperature until doubled in volume, about two hours.  Place the container in the refrigerator and store until needed.


Wednesday, March 4, 2009

In the bag


We're a brown-bag lunch sort of family. Okay, technically mine and Jamie's are blue, and Brianna's is pink. =) I've pretty much always taken my lunch to school or work, since I was little. Early on, my mom would make my lunch. That apparently lasted until I started to complain about what was in it (I don't like PB&J sandwiches), at which point I was told that if I didn't like it I could do it myself. =) Nowadays I take lunch to work most of the time because I know I'll like what I have, and it definitely saves money.

It was a bit of a shock this past fall when I realized that I would need to do something for Brianna's lunch when she started kindergarten. Up until that point, she got fed at day care (as Gillian still does). I had a feeling she wouldn't be that interested in buying lunch at school--she can be kind of picky. I asked her, and she wanted to bring lunch from home. And she has, every day but one so far--when I went and ate Thanksgiving lunch with her at school. (Mmm, cafeteria turkey and mashed potatoes. =) )


Brianna's lunch is usually a mix of different small things to eat, since I'm never sure how hungry she's going to be at lunch time. Today's, for example, included: a small yogurt drink, a small juicebox, a handful of blackberries, a small bag of Cheezits (probably for afternoon snack), and a little bagel with garlic cream cheese. The fruit varies (applesauce, blueberries, grapes, even cherry tomatoes). The snack varies (pretzels, goldfish). And the bready bit varies. Sometimes it's an actual sandwich. Sometimes it's bread with the meat and cheese on the side. Sometimes it's a wrap (tortilla in place of bread). This weekend, though, Brianna asked if she could have bagels in her lunch this week.


In the past, I've bought mini bagels at the grocery store. They're convenient and not that expensive. But frankly, they have about as much taste as cardboard. So in keeping with my BYOB goal, I decided to make my own mini bagels this past weekend. I've made big ones before, so I just had to adjust my shaping and timing a bit. I thought about trying a recipe that I saw on Baker's Banter, but I'm used to boiling rather than steaming the bagels before baking them. I'm sure I'll try their method eventually.   I usually form my bagels by making ropes of dough and joining the ends. But this time I tried the poke a hole in the middle approach shown in the article. It worked quite well with the smaller (about 2-ounce) pieces of dough. After shaping, I boiled the bagels for about 90 seconds on each side. I topped a handful of them with salt and left the rest plain--the salt ones need to be eaten right away or the salt dissolves and makes the bagels soggy on top. I baked them for about 5 minutes less than I do the big ones.

The verdict? Quite tasty, as expected. These are the perfect size for Brianna and Gillian. We ate some for breakfast on Sunday. I sliced the rest in half and put them in the freezer for B's lunches. Every day so far this week, she's actually eaten everything in her lunch. =)


If you want to BYOB, here's the recipe.  And I'm also submitting this to Yeastspotting.  

Mini Bagels

1 cup (5 ounces) white whole wheat flour (King Arthur)
2 1/2 cups (12.5 ounces) bread flour (King Arthur)
1 1/2 teaspoons table salt
3 tablespoons granulated sugar
1 1/2 tablespoons instant yeast
1 1/2 cups (12 ounces) room temperature water (I used bottled since my tap water is extremely hard)

canola oil (for dough bucket)

2 quarts water
2 tablespoons packed light brown sugar

toppings, if desired

Place the flours, salt, sugar and yeast in the bowl of a standing mixer.  Mix with the paddle on low speed until the dry ingredients are well blended.  Add the water and continue to mix with the paddle until a shaggy ball of dough forms.  Switch to the dough hook.  Knead the dough on low speed (between 2 and 4) about 7 minutes.  The dough will be much smoother, but will still be tacky.  Transfer the dough to a rising container that has been greased with canola oil.  Let the dough rise at room temperature until doubled in size (about 1 1/2 hours, I think).

Preheat the oven to 400 degrees F.  Place the two quarts of water in a wide pot and bring it to a boil.  When it boils, add the brown sugar and turn the heat down so the water just simmers.  

Meanwhile, remove the dough from the container and portion it into 15 equal pieces (2 ounces by weight).  Form each piece of dough into a smooth ball (like you're making rolls) and allow it to rest for a few minutes.  Poke a hole in the center of each dough ball with your finger and thumb and then twirl the bagel on your finger to widen the hole.  (see great pictures here--just scroll down)

Add the bagels to the water 3 or 4 at a time.  Simmer them for 90 seconds on each side, then remove them from the water and place them on a clean lint-free kitchen towel to drain.  After a few minutes, transfer them to a large baking sheet (13 x 18) lined with parchment paper.  Once all the bagels are on the baking sheet, place the pan in the oven (I usually put it directly on top of my baking stone).  Bake for about 20 minutes, then flip the bagels over and bake for about 5 minutes longer so that both sides brown well.  Let cool until just warm before slicing.


Wednesday, February 11, 2009

BYOB


This seems to be the time of year when I take on new challenges.  It's not really a New Year's resolution thing, since I don't get around to it until February.  Last year, when I was still very new to blogging, I joined two amazing groups--Tuesdays with Dorie and the Daring Bakers.  I was quite nervous about it at the time.  I knew I'd be making things that would take me out of my comfort zone.  (That was kind of the point...)  And when I make a commitment to doing something, I want to make sure that I follow through.  Yes, I'm a big worrier as well as a rule-follower. =)  Things have turned out great--in a year's time, I've only missed one DB challenge, and I've made all but a handful of the TWD weekly recipes.  More importantly, I've made some amazing blogging friends, more than I can mention here (but check out my list of blogs on the left for many more of them).  


I'm probably crazy, but I've decided to take on another personal challenge.  It's an informal group with a simple goal--BYOB (Bake Your Own Bread).  Yes, all of it.  My first thought was that I must be insane for trying to do this.  But when I really started thinking about it, it wasn't as scary.  Since I got the Artisan Bread book for Christmas, I don't think I've actually bought any bread at the store.  And over the past year, I've made a lot of things that I would usually buy, like croissants, pizza, Danish braids, doughnuts, hamburger and hot dog buns, and bagels.  

In most cases, I was pleasantly surprised that these baked goods weren't as hard to make as I thought they would be.  I find it really satisfying to make things myself.  Some, like the laminated doughs, required a fair bit of time and effort, but the result was so worth it.  And some weren't as successful--like the doughnuts, which I really need to try again. =)  I love making the bread that my girls eat, because I know what goes into it.  And they love eating it.  


As Sandy says in her original post, there aren't any "yeast police."  I may very well end up buying bread at some point, and that's okay.  I'm in this to have fun and make some new things, not stress myself out.  And speaking of new things, does anyone have a good recipe for whole wheat flour tortillas?  =)  (B & G love quesadillas...)

Monday, February 2, 2009

Puff the magic pastry


As I was reviewing last year, I was also thinking about things that I wanted to try in 2009.  I try to fit in as much baking as I can during the week and on weekends, but sometimes it's hard.  In fact, in October, I barely managed to  make my Tuesdays with Dorie and Daring Bakers recipes.  So it's always nice when I know I'm going to be on vacation, since it gives me a chance to try some new stuff.  In fact, I started my notebook (the one this blog is named after) during a week of vacation in May 2005.  Well, everything came together nicely, and over the past several days I've finally had a chance to make something that I've wanted to for quite a while. 


When I got my February/March issue of Fine Cooking, one article immediately caught my eye.  It was Croissants.  Laminated dough really used to scare me, until the June 2008 DB challenge when we made Danish Braids.  Even though I discovered then that it wasn't as hard as I thought, I still never got around to making anything else.  And then lately, I've been seeing croissants everywhere.  


I still managed to get a later start than I wanted, but it worked out okay.  The timeline in the Fine Cooking article has things spread out over three days.  On Friday, I mixed up the dough that would be wrapped around the butter.  It went into the fridge to develop flavor overnight.  Saturday morning, while Brianna and Gillian were occupying with cartoons and playing, I laminated the dough.  The recipe calls for three turns, but I actually did four.  The third one was particularly difficult for some reason--the dough really seemed to resist being rolled out.  So I waited a bit longer to do the last one, and it went better.  Once I was done, I wrapped everything up and stowed it back in the fridge until Sunday morning.


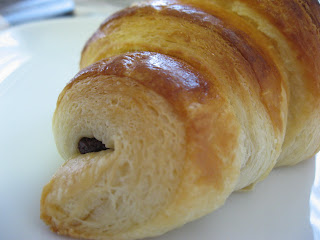
I was pretty surprised when I took the dough back out on Sunday, since it had risen quite a bit.  I cut it in half and carefully wrapped one half and put in in the freezer for later.  Then I rolled out the other half of the dough.  The dough rolled out nicely, which was really good, considering how sore my upper back was from Saturday's workout.  (It still hurts...)  I cut it as directed, ending up with 7 large triangles of dough and 2 small ones.  Most I rolled up as plain croissants, but I also wanted to make some chocolate filled ones.


Now I usually have plenty of chocolate on hand.  But I thought this would be the perfect opportunity to sample something new that I received recently.  At the end of December, I was lucky enough to qualify for a giveaway over at Blake Makes.  And a week or so ago I came home to find a small box containing my bar of Amano chocolate.  I saved a few squares to sample straight, and broke the rest into bars to put on three of my triangles of dough.


After letting the formed croissants rise for a couple hours, I baked them for a little less than 20 minutes.  The whole house smelled amazing.  The hardest part by far was waiting for them to cool long enough to avoid burning my tongue on molten chocolate.  


The verdict?  Oh, it was totally worth all the work.  The croissants tasted amazing!  It's good that I froze part of the dough.  It's bad enough that I made as many as I did, since I don't think they'll last very long.  I ate one of the chocolate ones for brunch (definitely too late to be called breakfast) and used another for my sandwich at lunch.  Gillian ate one of the small ones and really enjoyed it.  Brianna ate the middle out of hers and complained that she didn't like the crispy outside.  Crazy, I know.  But typical... =)  


I'm posting this as part of Magazine Mondays, and also submitting it to Yeastspotting.  If you're looking for a workout and want to give these croissants a try, you can find the recipe here. (It appears to be free for everyone at the moment.)