Tuesday, April 28, 2009

Don't forget the googoo goggles


Big G, little g, what begins with G?  Gillian and goat.  G...g...G  And I swear lately that my younger daughter has more in common with a four-legged garbage disposal than just a letter. =)  (My apologies to Dr. Seuss.)  I know that babies go through a stage of putting everything in their mouths.  But shouldn't it have stopped by now (2 1/2)?  If you ask Gillian what is supposed to go in her mouth, she'll tell you "Food!  And drinks!"  But apparently she'd rather chew on paper, and stuffed animals, and whatever else she can get her hands on.  In fact, she's mad at me right now (Monday night) for taking away a book that she was chewing on.  

And naturally, she fought me about eating her actual dinner.  Mostly because she's very tired, and didn't nap much today.  She was quite put out when I told her that if she didn't have room for her dinner, she certainly didn't have room for dessert.  She was particularly unhappy because it involved one of her favorite things, chocolate.  (Which she pronounces much better these days...)  Brianna can be pretty stubborn, too, but when I threaten to take away anything resembling chocolate pudding, she falls in line pretty quickly. =)

And this week's Tuesdays with Dorie recipe bears more than a passing resemblance to chocolate pudding.  Kim of Scrumptious Photography picked Chocolate Cream Tart for us to make this week.  The base is a chocolate shortbread crust, which is filled with bittersweet chocolate pastry cream and topped with whipped cream.  I actually got a bit of a head start this week, making the tart dough on Saturday.  Since I knew the completed tart wouldn't keep very well, I decided to make use of my tartelette pans for a change.  That way I could make several small tarts and assemble each of them just before serving.  The full recipe of dough (for a 9-inch tart) worked perfectly for four of my 4 1/2-inch pans.  After pressing the dough into the pans, I stuck them in the freezer for several hours and finally got around to baking them Saturday night.  Even though Dorie says it isn't necessary, I filled them with dried beans (as pie weights) for the first part of the baking.  My parchment paper ended up sticking a bit, but not too badly.  (And I learned my lesson and used non-stick foil instead when making my cheesecake crusts on Sunday.)


I didn't get to the chocolate pastry cream until Sunday morning.  I've made variations of Dorie's pastry cream several times now.  I'm not overly fond of plain vanilla pastry cream (that custardy thing again), but I do enjoy the flavored versions.  And this one has a whole bunch of bittersweet chocolate mixed in (I used El Rey 61%), so how could it be bad? =)  Now I just have to use up the leftover egg whites.  I have a ton in my freezer already.  I'd usually use them to make angel food cake, but just haven't gotten around to making one lately with all the other things I have to do.  

I assembled one of the small tarts for dessert for Brianna and Gillian on Sunday night.  The small pans have shorter sides, so you can't put quite as much filling in them.  (Oh, darn, we might just have to eat the extra chocolate cream.)  I already had some lightly sweetened whipped cream in the fridge, so that part was easy.  And I'd remembered to pick up a bar of bulk chocolate in addition to my usual discos, so I was able to make some chocolate shavings.  I was trying for curls, but got impatient.  (One thing that helps is microwaving the chocolate bar on low power for a few seconds.)  

The verdict?  This tart is definitely more than the sum of its parts.  The tart shell by itself is not very sweet at all.  But it's a great foil for the amazing chocolate pastry cream.  And the whipped cream on top is essential.  It provides a delicious contrast to all the chocolate.  Brianna and Gillian didn't like the crust as much--while they do like dark chocolate, it wasn't quite sweet enough for them, I think.  But they devoured the "chocolate pudding" and whipped cream.  I'll definitely be making this recipe again, though I'll probably skip the crust for the girls.  

If you want to try this one for yourself, head on over to Kim's blog for the recipe.  And while you're there, be sure to take the time to look at her other gorgeous posts.  She takes the most wonderful pictures of everything.  And be sure to head over to Tuesdays with Dorie to see what the other TWD geniuses have created this week.  =)


Monday, April 27, 2009

Berry good cheesecake


So it would seem that April is cheesecake month for the Daring Bakers. =)  Last year, we had fun making cheesecake pops.  This year we have a different cheesecake to play around with.  The April 2009 challenge is hosted by Jenny from Jenny Bakes.  She has chosen Abbey's Infamous Cheesecake as the challenge.  We had to use the basic cheesecake recipe provided, including a crust, but were free to play around with flavorings of both the filling and the crust, as well as toppings.  In fact, we were encouraged to be quite creative. =)

I've made cheesecake quite a few times, so I wasn't too concerned about the process.  The cheesecake recipe provided was fairly straightforward, though a bit different than the one I usually make.  My favorite one is from Rose Levy Beranbaum.  It uses sour cream, while the one for the challenge uses heavy cream.  And I usually use just egg yolks, rather than whole eggs.  I always use a water bath, so I was comfortable with that as well.

The big question was how to play around with the recipe.  I knew that I'd be making the cheesecake near the end of the month.  As I've mentioned before, I tend to be the maker of birthday cakes wherever I work.  One of my employees has a birthday on the 28th, and cheesecake is his favorite.  But when I asked him what kind he likes, he said plain!  Or maybe I should say, classic. =)  With strawberry sauce.  So I kept things simple.  The big challenge for me was actually making different sizes of cheesecakes at the same time.  I wanted to make a 7-inch cake to take into work, and planned to make several 4-ounce ramekins with the remainder of the batter.  

One thing I knew I wanted to do was to use a pastry crust, rather than crumbs.  I never seem to have good luck with crumb crusts.  The butter leaks out of the bottom of the springform pan, and it seems like half the crust always stays in the pan when I try to remove slices.  So I turned to my trusted source, Dorie Greenspan's Baking From My Home to Yours, and made the Sweet Tart Dough for the crust.  I used it to line the springform pan and four 4-ounce ramekins.  I wanted to make sure that the crusts wouldn't get soggy, so I baked them pretty well, until they were getting brown around the edges.  While I let the baked crusts cool, I worked on the filling.


I like the bit of tang that sour cream usually gives my cheesecake.  Since I wasn't using it for this one, I increased the citrus a bit.  I used the juice of one lemon and one lime in the filling, about 3 tablespoons total.  I reduced the vanilla to one teaspoon, and added about a tablespoon of rum as well.  Other than that, I stuck to the basic filling recipe.  Oh, and did I mention that I had the great luck to find Philadelphia cream cheese on sale for $0.99 a package?!  The filling was enough for the pans I'd prepped with a little left over, so I filled two little 3-ounce ramekins as well (no crust).  One of the difficulties with using a springform pan in a water bath is the chance that water will leak into the pan and make the bottom of the cheesecake soggy.  Part of my plan to prevent that was using the pastry crust.  Some people have mentioned wrapping the pan with plastic wrap and then heavy duty foil (the water bath keeps the plastic from getting too hot).  Instead of that, I put my springform pan inside one of the disposable liners I use for my slow cooker (I trimmed it down a bit), and then wrapped it in heavy duty foil to hold it in place.  The ramekins, of course, didn't need anything like that.  

I knew that my larger cheesecake would take the longest to bake, so I gave it a head start.  I put it in the water bath in my roasting pan and put it in the oven.  After it had been in for 20 minutes, I added the ramekins to the pan and set the timer for another 20 minutes.  At that point, none of the cheesecakes looked done, so I gave them another 10 minutes.  The ramekins all seemed pretty done then, so I took them out of the pan.  The 7-inch pan seemed to take forever.  I gave it another 15 minutes.  It was still jiggly in the middle, but that was expected.  I turned off the oven and left it in for 45 minutes.  The ramekins were pretty firm after cooking on the counter for a bit, so I just moved them to the fridge.  I let the larger pan cool to room temperature and then refrigerated it as well.

The verdict on the big cheesecake will have to wait.  But we did sample one of the little ones.  I briefly considered trying to take the cheesecake out of the ramekin, but quickly decided that wasn't going to work.  So we just attacked it with a couple of spoons.  For the topping, I diced some strawberries and sprinkled them with sugar.  I added a splash of rum and a bit of lime zest to echo the flavors that I added to the cheesecake.  The verdict?  This is a really good cheesecake recipe.  The texture is firmer than the one I usually make--not a bad thing, just a bit different.  That's probably due to the whole eggs instead of just yolks.  I'm glad I went with a simple approach--it really let the flavor of the cheesecake come through, which paired nicely with the strawberries.  Guess there's a reason why that's a classic combination, huh? =)  Jamie and I really enjoyed it.  The buttery crust was good as well, though a bit hard to get out of the ramekin.  It should be easier to deal with on the larger cheesecake.  All in all, definitely a recipe that I'd like to make again.  (Oh, and I lied--we ate two.  We had one of the extra 3-ounce ones to see how the cheesecake tasted on its own.  Really good.)

The recipe for the tart dough can be found in this article.  For the cheesecake recipe, head over to Jenny's blog.  And be sure to check out the blogroll over at The Daring Kitchen to see what everyone else came up with this month!

Friday, April 24, 2009

Nuts about shortbread


I mentioned a couple days ago that I had a TWD rewind in the works.  I actually made these cookies several weeks ago, not too long after everyone made the Coconut Butter Thins that Jayne picked.  I didn't get a chance to make them in time to post on the correct day.  And then there's the fact that I don't like coconut, either.  Several people said that they couldn't taste the coconut, or that they liked the cookies even though they don't like coconut.  Sorry, that doesn't work for me.  I detest coconut.  The flavor, the texture, the smell...  Can't stand it.  As in, won't even let it in the house.  You know the boxes of assorted chocolates you can buy?  Well, I always break the pieces open before I eat them because I'm so afraid of biting into a coconut cream-filled one. =)  And this is one of the few food dislikes where Jamie agrees with me.  (He eats pretty much anything but coconut and lima beans.)  Gillian and Brianna may decide someday that they like it, but they won't find that out here. =)

So I decided to make the shortbread; the next question was what sort of flavoring to use.  I looked through my Dorie book, and realized that the recipe for the coconut thins was pretty similar to the one for Brown Sugar Pecan Shortbread.  That was the first recipe that Laurie made, so it was one that I missed.  I ended up sort of making my own version of the shortbread.  I used the brown sugar instead of white.  Instead of pecans or macadamia nuts, I went with roasted and salted cashews.  And for spice I used cardamom.  


The dough was simple to mix together in my stand mixer.  Once it was ready, I put the dough into a gallon zip-top bag as directed and spread it out until it filled the bag.  Then it went into the freezer, and ended up staying there for a couple days until I found time to bake the cookies.  I let the dough thaw in the fridge before I cut it into squares.  I eyeballed it, rather than using my ruler, so the squares weren't exactly square, or quite the same size.  Oh, well. =)  I baked the cookies on a parchment lined pan in two batches.  The second pan was in the oven a bit longer, so the cookies browned more. 


The verdict?  I definitely can't make these too often, because I managed to eat most of them myself.  Boy, were they good.  I love shortbread to begin with.  This shortbread was terrific, with a bit of a caramel taste from the brown sugar.  The salty cashews were a great addition.  I liked the second batch better, since it had a stronger browned-butter taste.  And they were excellent with a cup of tea.  I will certainly be making these again.  (Everyone else here seemed to like them as well, which is not too surprising, since everyone really likes cashews.)

For the recipe, start with the one on Jayne's blog, here.  I used 3/4 cup of packed light brown sugar instead of the 2/3 cup white sugar.  I substituted cardamom for the coriander and left out the lime zest.  And I used the same amount of cashews in place of the macadamia nuts.  Try my version, or make up your own!


Tuesday, April 21, 2009

Unfinished business


I had every intention of making this week's Tuesdays with Dorie recipe.  This week, Lauren of Upper East Side Chronicle chose Four Star Chocolate Bread Pudding.  I've never made bread pudding.  Heck, I'm not even sure I've eaten bread pudding.  And this was chocolate bread pudding, and I love chocolate.  

Unfortunately, the picture above is as far as I got.  I made bread--I made hamburger buns for Sunday's dinner and turned some of the extra dough into a small loaf.  I cut slices of the bread and left them out all day Monday to get stale.  But I guess it just wasn't meant to be, at least this week.

This'll be familiar to a few people that I talk to on Facebook...  Gillian is driving me crazy.  She's two and a half, and it shows.  She's lucky she didn't go to school naked yesterday.  Jamie and I pretty much had to wrestle her into her clothes, with her screaming the whole time about how she didn't want to get dressed, or go potty, or pretty much anything else that we wanted her to do.  I remember Brianna going through a similar stage.  I just hope Gillian's is short-lived, because I don't know how much more of it I can take.  And to make things that much worse, this is exactly the sort of situation where I really wish I could just pick up the phone and call my mom.  I did talk to Dad, and one of my aunts, but it's not quite the same.  *sigh*  

So between kid issues and work issues, I just feel completely worn out.  I'm having a hard time finding the motivation to bake or to blog about the things I have baked.  I have 4 or 5 blog posts started that are just sitting there, waiting to be finished.  I am baking (check out the baking log on my sidebar), but nothing fancy.  But I'm trying to work through this funk and get going again--I think I'll feel better if I do.  I'll have an unofficial TWD rewind post coming in the next day or two, along with a Pay it Forward giveaway that's long overdue.  I'll also have some information soon about my participation in Adopt-a-Blogger.  (It's now closed to newbies, but if you're an experienced blogger who would like to be a mentor, head over to Kristen's blog and let her know.)  So be sure to check back!

Meanwhile, head on over to Lauren's blog for the chocolate bread pudding recipe.  And head over to Tuesdays with Dorie blogroll and see how everyone else did with this week's recipe.

Tuesday, April 14, 2009

Time for dessert


Yes, I'm down to the wire.  Fortunately, this week's Tuesdays with Dorie recipe is perfect for that.  Holly of PheMOMenon chose 15-Minute Magic--Chocolate Amaretti Torte for us to make this week.  And I'm happy to report that it really did come together in a short amount of time.  Unlike some of my blogging friends, I didn't actually time it.  =)  But even with Brianna helping, it was in the pan pretty quickly.  And it didn't really tie up the oven for that long, either.  


The ingredient list was fairly short, but did have one key thing that a number of people had trouble finding.  Dorie recommends a specific brand of amaretti cookies, Amaretti di Saronno from D. Lazarroni & Co.  Some people had a hard time finding amaretti at all, let alone those ones.  Some people made their own.  I am fortunate enough to have a great place to shop, and I was able to find the small version of the cookies.  There was a spot on the shelf for the big ones, but it was empty.  

Besides the amaretti, you just need chocolate, almonds, sugar, eggs and butter.  And the batter comes together quickly in the food processor.  It goes into a parchment lined 8-inch pan and is baked until cracked on top and the center is still moist but not wet--25 to 30 minutes (mine took 33).  Once cooled, the torte gets a ganache glaze.  I didn't quite follow the recipe there--I just made some ganache with 2 ounces each of bittersweet chocolate and heavy cream and added a bit of rum to it.  


The verdict?  Jamie really liked it, which I expected.  I thought it was okay, but I'm not a big fan of almond flavor, and the amaretti are very strongly flavored.  Since it was so late, I didn't chill the torte at all.  I wonder if I might like it better cold.  I'll have to let the girls try it tomorrow.  Worst case, I'll keep some for Jamie and take the rest to work or to the teachers at the daycare. =)  

To give the torte a try for yourself, head on over to Holly's blog for the recipe.  And be sure to check out all the other wonderful variations on this week's cake by looking through the TWD blogroll.  


Monday, April 13, 2009

Monkeying around


I'm not entirely sure why, but Gillian really loves monkeys.  The first sign was when she started to carry around a small stuffed Curious George that belongs to Brianna.  Brianna wasn't exactly thrilled with that, so fortunately Santa Claus brought Gillian a Curious George of her own (yay for Kohl's Cares for Kids).  We have a couple of monkey cups that she's quite fond of as well, often arguing with Brianna about who will get which one.  They have a carpet with animals on it at her daycare, and she claimed the monkey as her spot to sit during circle time.  She likes to sing about the Five Little Monkeys (jumping on the bed and swinging in the trees, both).  And it's quite entertaining to ask her what monkeys say--"Ooh, ooh, aah, aah!"  

And then there's the fact that she acts like a monkey.  She was quicker than Brianna was to start climbing into and out of things.  Like the playpen, and then her crib.  It's still pretty funny to watch her climbing over the side, which stays lowered all the time now--she's quite capable of scaling it when it's up, which is rather scary to watch.  We have a very difficult time convincing her not to climb over the arms of chairs and the couch, not to mention actually getting her to stop standing on the furniture.  Brianna still wins for climbing the front of the refrigerator, though... =)

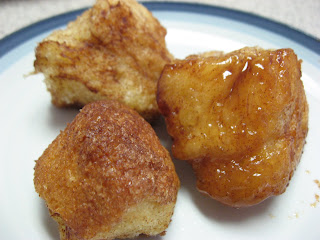
So with all the monkey business around here, it's kind of surprising that it took me this long to get around to making another monkey item--monkey bread.  What made me decide to make some was a great post about Monkey Bread Muffins over at Two Peas and Their Pod.  I'm not really sure why it's called monkey bread, but boy, is it tasty.  =)  Sort of like cinnamon rolls, but with the cinnamon on the outside.  And fun to eat, especially with kids, since you get to pull it apart.  I was home by myself when I decided to make some, but it would be a great thing to make with kids, as well--they'd have a lot of fun rolling the dough in the butter and sugar.  

I used the bread dough that I already had in my fridge, which was a result of my monkeying around with another Artisan Bread in Five recipe.  I was looking for dough that would make a good sandwich loaf.  The recipe for Buttermilk Bread caught my eye, and it was something I hadn't tried yet.  It's not that different from the basic dough, but you substitute buttermilk for some of the water and add a bit of sugar, both of which make for a more tender crumb.  However, I started to get everything together to make the dough and then discovered that I didn't actually have buttermilk.  I don't always have it around, since I have a bad habit of opening a pint container, using about half a cup and then forgetting that I have the rest.  What I did have, though, was plain yogurt.  I figured it was worth a shot!  

The verdict?  The dough turned out great.  I liked the bit of tang in the finished loaves of bread.  And it worked quite nicely for the monkey bread--not too chewy.  And not too sweet, which was good since there was plenty of sugar on the outside.  I will definitely make both the plain loaves and the monkey bread again.  I'd like to try it with part whole wheat, too.

For the full bread method, head over to the Artisan Bread in Five website, or check out a copy of the book.  For lots of other great bread, be sure to check out the BYOB roundups.  And I'm submitting this to Yeastspotting (this week hosted by Zorra) as well, another wonderful source of inspiration.


Monkey bread

4 tablespoons unsalted butter, melted
1/4 cup packed brown sugar
1/4 cup granulated sugar
1 1/2 teaspoons cinnamon
20 ounces bread dough (see below for what I used)

Spray an 8 1/2 by 4 1/2 inch loaf pan (I use Pyrex) with baking spray.  Mix the sugars and cinnamon together in a small bowl.  Using a bench scraper, cut the dough into small pieces about the size of a walnut.  Dip each piece of dough in the melted butter, roll it in the sugar mixture, and then place it in the loaf pan.  If you have any butter or sugar left, drizzle/sprinkle it over the top of the dough balls in the pan. Don't pack the dough balls in too tightly.  

Loosely cover the pan with plastic wrap and let the dough rise at room temperature until the pan is about three-quarters of the way full.  While the dough is rising, preheat your oven to 350 degrees F.  Place the pan on a rack in the middle of the oven and bake for about 50 minutes.  The dough will fill the pan and be nicely browned on top.  The center of the loaf should be 190-200 degrees F when done.  Let rest in the pan for about 5 minutes, and then invert the bread onto a serving platter.


Yogurt bread dough
(adapted from ABin5)

18 ounces room temperature water (I used spring water since my tap water is extremely hard)
8 ounces whole milk yogurt (Brown Cow)
2 pounds unbleached all-purpose flour (King Arthur)
1 1/2 tablespoons granulated sugar
4 teaspoons kosher salt
4 teaspoons instant yeast

Place the water in the bowl of a standing mixer.  Stir in the yogurt.  Add the dry ingredients to the bowl.  Using the paddle attachment, mix on low speed until the dough starts to come together.  Switch to the dough hook and mix on low speed for one minute.  Transfer the dough to a large (5-6 quart) covered bucket.  Let it rise at room temperature for about two hours, then refrigerate.  Use the dough within seven days.


Tuesday, April 7, 2009

Going bananas


My children can be picky eaters.  (I may have mentioned this before...)  Not all the time, but often enough.  Some of that is just because they're kids, of course.  =)  Gillian is actually a lot better than Brianna most of the time.  If she says she doesn't like something, it's usually because she really doesn't like it.  With Brianna, it's all about the power struggle.  It can be particularly infuriating when she claims to dislike something that I know darn well she ate with no problem the week before.  I even get mixed responses to dessert.  They both eat pretty much anything chocolate.  But they often disagree on other options.  For instance, Brianna claims to dislike raisins in all baked goods.  Gillian, on the other hand, sits there and picks the raisins out so she can eat them first.  There are a few other things like that.  But another thing that they agree on is a love of pudding.  (Well, except maybe rice pudding.)

For Tuesdays with Dorie, the month of April will be filled with lots of chocolate, so I know most of the recipes should go over well.  But for this week, we start off with something I wasn't too sure about--Banana Cream Pie.  It was chosen by Amy of Sing for Your Supper.  I didn't mention it above, but I'm pretty sure the girls get some of their picky tendencies from me.  =)  I don't like banana cream pie.  Honestly, I don't really like most things banana, unless I'm in just the right mood.  But I already felt really bad about missing last week, and didn't want to skip another recipe.  What to do?  

First, I decided to only make half the recipe.  And then I decided to skip the pie crust and just make small parfaits.  I asked Brianna if she liked banana pudding.  I wasn't sure if she'd had it, but it turns out they made it at daycare at some point.  She was quick to tell me, though, that she was sure I could make one that was much better.  Wow.  Considering the above-mentioned power struggles that we've been dealing with, that was quite the compliment! =)  She then told me how I need to make them--put pudding in the bottom of the bowl, put sliced bananas around the sides, and put whipped cream in the middle.  So that's what we did.


The pastry cream came together pretty easily.  Of course, I've had a few other opportunities to make pastry cream from Dorie's recipes, so I knew what to expect.  The brown sugar and vanilla added a nice caramel character, and the spices were a good addition as well.  After chilling, the cream was quite thick, but I got to vent some of my frustrations by whisking it until it loosened up. =)  For the whipped cream, I just added a bit of sugar (to taste) to some heavy cream, and skipped the sour cream.  I like the tang that sour cream adds, but I was afraid my young pudding eaters wouldn't care for it.  

The verdict?  This pretty much never happens, but Brianna and Gillian ate all of this week's TWD recipe by themselves (over the course of two days).  Jamie got to finish off a bit of pastry cream left in the bowl, but that was it.  The first day, I made them both dishes with all three elements--pastry cream, bananas, and whipped cream.  Brianna ate all of hers--amazing. =)  Gillian tasted hers, made me take the bananas out (even though she usually likes them), and polished off the rest.  I was pleasantly surprised--I expected some sort of complaint about the spices, but didn't get one.  For day two, Brianna requested that I leave the whipped cream off of hers.  (I was actually kind of surprised she ate it the first day.)  And I left the bananas out of Gillian's.  Again, gone.  All in all, a very good result.  

For the full recipe, be sure to head over to Amy's blog.  And I'm sure the other TWD bakers have come up with some creative takes on this week's recipe, so check the blogroll as well.