Pages

Tuesday, April 27, 2010

Pantry raid


One of the reasons we picked the particular floor plan for our house was the kitchen.  After living in apartments for many years, I was incredibly excited at the prospect of having more than enough kitchen cabinets and a fantastic pantry area with plenty of shelves.  When we moved into the house, I had quite a bit of kitchen gear already, but was looking forward to actually having room for more.  Well, eight years later, I've done a pretty good job of filling things up. =)  In fact, my old cookbook shelf is now home to some of my more interesting to look at stuff (madeleine pans, tart pans, etc).  And thanks to blogging--and especially being part of groups that challenge my skills and get me to bake new things)--these days my pantry is also filled to overflowing. 


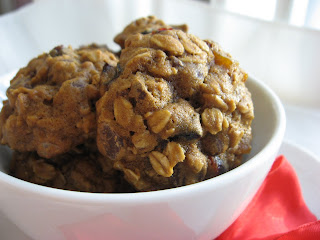
Bread baking alone has dramatically increased the variety of flours and grains that I keep on hand.  All-purpose, bread, whole wheat, white whole wheat, rye, semolina, oats, cornmeal...the list goes on.  And then there are the various sugars and other sweeteners.  Don't even get me started on the chocolate!  Then there's the category that really came in handy this week--I have quite a variety of dried fruit.  I never would have guessed that I'd use it so much in baking all sorts of things, and the girls love to eat it, too.  The reason the fruit was so good to have on hand is that this week's recipe (chosen by Mary of Popsicles and Sandy Feet) is Chockablock Cookies.  As you might guess from the name, these cookies have all sorts of great stuff mixed in.  No problem at all for someone with a well-stocked pantry. =)


I did make a few changes this week, both with the method and the ingredients.  I took the easy route in making these cookies, and did the mixing by hand with a wooden spoon.  That's my favorite method for mixing up cookies, especially drop cookies.  As any long-time reader of my blog could predict, the first thing I ditched from the recipe was the coconut.  It's not allowed in my house, except under extremely special circumstances. =)  I also decided to leave the nuts out, since I knew Brianna and Gillian would be more likely to eat the cookies without them.  I don't mind nuts in some things, but wasn't in the mood for them, either.  I decided to go for a variety of dried fruit, thanks to the abundant supply in the pantry.  I used half a cup each of chopped dried mango, dried cranberries, and chopped prunes.  Yes, prunes.  My kids love them (to the point where I really have to make sure they don't eat too many, as that would have unfortunate consequences), and thanks to Dorie, I've discovered that they're great with chocolate.  I know a lot of people substituted for the molasses, but I like it, so I kept it, using the mild stuff.  I also used all butter, rather than a mix of butter and shortening.  After mixing up the dough, I used my #40 disher to portion out the dough onto a parchment-lined baking sheet.  I ended up with a total of 40 cookies, and baked them for 16 minutes.


The verdict?  Pretty good.  There are a few more things I'll change if I make these again, but they were good.  I like molasses, but it seemed like these needed something more.  I don't like cinnamon with chocolate, but I think I'll add some ground ginger next time, since it pairs well with the molasses.  Along those same lines, I think some chopped crystallized ginger would be a good addition, too.  B liked the cookies, but isn't a big fan of the cranberries, so I'll probably leave those out.  The mango was great, and I like it with the chocolate.  It was hard to detect the prunes, but I'd probably leave them in, especially since my kids are big fans.  All in all, a fun cookie to play around with some more.

If you'd like to try these for yourself, I highly recommend getting your own copy of the book.  For this particular recipe, you also find it over at Mary's blog.  And be sure to check out what everyone else did this week, here.  


Monday, April 19, 2010

And one to grow on


I love birthdays.  It doesn't matter if it's mine or someone else's.  I love presents, and special dinners, and cake, of course.  My birthday and Jamie's are exactly 7 weeks apart (okay, except for leap years, when there's that extra day in there).  I'm the older one.  Most of the time that's no big deal, unless it's a birthday of some significance.  Like next year will be--we turn 40 next year.  And if the last major milestone was any indication, I'd better start looking for obnoxious birthday cards now.  Because the year we turned 30, Jamie got to all the good cards before I did.  Yes, cards.  Like, 3 or 4 of them.  I had to work much, much harder to find something appropriate to respond with. =)  This year, the only real significance that I noticed with the difference in our ages was the census.  As I was filling out the form, it said to put ages as if the form was filled out on April 1st.  That means that for official purposes, I am 39, while Jamie got to be 38.  That hardly seems fair, does it?

But I decided to be nice and make some yummy birthday cupcakes for him anyway.  =P  I can't get away with making cupcakes for Gillian or Brianna most of the time.  They want an actual cake.  (Okay, now that I think about it, I ended up making cake and cupcakes for Brianna, one for home, the other for school.)  But Jamie seems to be okay with cupcakes, or at least he's never told me that he isn't.  As I've mentioned before, everyone in this house likes chocolate cake with chocolate frosting the best, except for me.  So I had at least some idea of what I would be making.  The question was whether I'd be using recipes I'd made before, or something new.


As I was standing in the checkout line at Central Market the Friday night before Jamie's birthday, I looked over the cooking magazines as I usually do.  (They have a really great selection.)  The new Cooks Illustrated caught my eye.  One of the recipes mentioned on the cover was Ultimate Chocolate Cupcakes.  That sounded perfect.  I picked up the magazine and skimmed the article.  Chocolate cupcake, with ganache filling baked in, and chocolate Swiss meringue buttercream on top.  Wow.  More than perfect.  Keeping my fingers crossed, I put the magazine back, and reminded myself to check the mail when we got home.  Sure enough, my copy of the magazine was waiting for me in the mailbox.  

There were a few expected things in the recipe, and a few unexpected ones.  As is often the case with chocolate, coffee is added to enhance the flavor.  There actually isn't any dairy in the batter itself.  The butter is replaced with oil (plus there's fat from the chocolate).  Since coffee is the liquid rather than buttermilk, a little vinegar is added to react with the baking soda for leavening.  And the flour used is bread flour, to help strengthen things so you don't end up with crumbs everywhere when eating the cupcakes.  To add more chocolate flavor (in case bittersweet chocolate and cocoa powder aren't enough), ganache is dolloped on top of the batter before baking.  It then sinks, to make a creamy chocolate center for the cupcakes.  Finally, there's the amazing frosting.  I love Swiss meringue buttercream, but have never made a chocolate version. 


The verdict?  Wow.  These are some wonderful cupcakes.  As promised, the cake is not too crumbly.  And the frosting is amazing.  The only thing that needs some work is the filling.  While it was quite tasty, it sank almost to the bottom of the cupcakes.  I'll have to play around and see if I can do anything about that.  We will definitely be having these again!  The birthday boy enjoyed them a lot, as did the girls.  If you'd like to try them for yourself, I definitely recommend picking up a copy of the magazine.  It's the May/June issue of Cooks Illustrated, which should be available for a while yet.  You can also get access to that recipe and many more by subscribing to their website.  And for some other great recipes from magazines, check out Ivonne's blog for Magazine Mondays.  


Sunday, April 18, 2010

Tasty cake


Quick post this time (as quick as mine ever are), since I'm already posting this incredibly late.  I was very excited that one of my favorite food bloggers and Twitter friends got to pick our Tuesdays with Dorie recipe last week.  Nancy has two wonderful blogs, one devoted to yeasted creations and the other a wonderful collection of sweet and savory dishes.  She's a woman after my own heart, posting her recipe notes and often figuring out the math to fit a recipe to the pan(s) she wants to use. =)  And I've been fortunate enough to bake along with her on quite a few occasions, with recipes from all sorts of different sources.


For this week's TWD pick, she selected a wonderfully easy and tasty cake for  us to make, Swedish Visiting Cake.  As Dorie indicates in the recipe notes, this one is quick to mix up and bake.  That's good, because I decided to tackle it before work one morning last week.  I'm happy to say that it was indeed quick and easy.  Part of the reason I was baking early in the morning was because I wanted to take some of the cake to someone who was nice enough to do a favor for me.  So I decided to make the full recipe, but split the batter between my two 6" round pans.  That way I would have one to give away and the other for us to taste.  I greased my pans with baking spray, and thought about lining them with parchment, but decided to go with out it.

Mixing the batter reminded me a bit of the French Yogurt Cake (before I played around with it).  First you rub lemon zest into sugar, which smells wonderful. =)  Then you whisk in the eggs, flavorings and salt.  (I stuck with just the vanilla extract, since I don't like almond extract very much.)  Then you stir in the flour, and at the end you fold in melted butter.  Once in the pan, the batter gets topped with sliced almonds and a sprinkling of sugar (I used coarse decorating sugar).  My cakes only needed 20 minutes to bake.  After letting the cakes cool in the pans for about 10 minutes, I was able to carefully turn them out onto a couple of plates to cool.  (I really need to get some more disposable plates for when I'm giving stuff away--the only ones I have are pink or Princess.)  When I got home from work that night, I decided to dress up the cake that I kept with a bit more lemon.  I made a glaze with some juice from the lemon I zested, plus some powdered sugar.


The verdict?  This cake was very tasty.  Great for sharing, whether with people coming over or if you're the one doing the visiting.  For the cake that I gave away, I don't know what the recipient thought of it.  I ate the other one over the course of several days.  No one else actually got to sample it.  Oops.  =)  It's excellent with tea.  I'll definitely be making this one again.  I think it would be fun to try different types of zest for flavoring, or add some sort of fruit.  

If you'd like to try this one for yourself, head on over to Nancy's blog.  She has the recipe as well as some great process pictures.  And be sure to see what the other TWD bakers thought of this one!


Tuesday, April 6, 2010

Confidence


Something came up at work recently that caused me to assess my writing and presentation skills.  I've come a long way from where I used to be.  Not with the writing part--I've never had much trouble with that.  But there was a time when I was completely petrified at the thought of speaking in front of people. It goes a long way back--I can remember a situation as far back as 3rd grade.  I was very shy as a child, probably in part because we moved around a bunch when I was in grade school and I went to a number of different schools.  I was okay with people once I got to know them, but still hated larger groups.  Even in college, when I had to do more presentations (I even had to take a short class on it as a graduation requirement) I was incredibly anxious more often than not.  

So it's pretty amazing to me to think that I put this blog out there for anyone to read, week after week.  Sure, there's a certain amount of anonymity, since I don't have to see the people who are reading it, but I'm still surprised at how much I enjoy it.  And it's so cool to see how far I've come with the presentation.  It took a while to come up with a consistent style, but eventually I did, and I like it.  It's made me realize that I'm better at this sort of thing than I thought. =)  And really, confidence is the key.  Somewhere between the end of college and now I realized that as long as I feel like I know what I'm talking about, presenting things to others isn't so bad.  Good thing, since I've got a really important presentation coming up!  Too bad I can't just take along some baked goods to help win them over. =P


This week's Tuesdays with Dorie recipe is a great one in the presentation department.  Erin of When in Doubt...Leave it at 350 picked the lovely Mocha-Walnut Marbled Bundt Cake for us to make this week.  This cake is pretty straightforward to mix up.  It uses the creaming method, so you beat together butter and sugar, then beat in the eggs and vanilla.  Then you alternate adding dry ingredients and milk (dry, wet, dry, wet, dry).  To get the chocolate batter for the marbling, you start by dividing your batter in half.  One half is good to go as is, while the other gets some chocolate and coffee added to it.  For the mocha flavor, you're supposed to melt together bittersweet chocolate, a bit of butter, some coffee and some espresso powder, then let it cool and add it to the vanilla batter.  I'm not a coffee drinker, so the only time our coffee pot gets used is when we have visitors.  So I just used water in place of the coffee and added an extra half-teaspoon of espresso powder.  It seemed to work fine.  

Next, I got to put the batter in my new bundt pan!  It's the classic shape from NordicWare.  I found it at Target, of all places.  A couple weeks ago, I was wandering through the housewares section and discovered a bunch of NordicWare stuff.  I don't think they've been carrying it long, since I don't remember seeing any of it before.  Anyway, I was able to acquire a lovely new pan for about $20.  Awesome!  Okay, back to the baking notes...  I generally coat my bundt pans with baking spray (e.g. Pam for Baking) to avoid sticking problems.  Worked quite well, as usual.  I added the vanilla batter to the pan, watching to make sure I didn't leave any big air bubbles around the edge of the pan.  Then I poured the chocolate batter on top and swirled the two just a bit with a butter knife.  The batter didn't fill the pan as much as I thought it would, but one thing I like about this pan is that it seems to result in a nice shape even if you don't fill it as much.  You end up with a shorter but still pretty cake.  I baked my cake for 60 minutes.


The verdict?  This is a very yummy cake.  Everyone here enjoyed it.  I guess the nuts were chopped finely enough, because I didn't get any complaints from my usual nut hater. =)  I really enjoyed the contrast of the two flavors.  The chocolate part in particular was very moist.  And I love, love, love my new pan--the crust came out such a lovely and delicious golden brown.  The cake was great on its own with a cup of tea, but a little chocolate sauce on the side doesn't hurt, either.  I can definitely see myself making this one again--I'd like to try it with pecans.  The one thing that I'd like to do better is the marbling/swirling.  I just ended up with a chocolate blob shape in the center of most of the pieces (the one I photographed was the most interesting I could find).  I'd like to try again for something prettier. =)

If you'd like to give this one a try, head on over to Erin's blog.  And don't forget to see what everyone else did with this recipe this week.  You can find a list of people who participated here.  


Saturday, April 3, 2010

When the moon hits your eye...


If I had to pick a single favorite food, it would be pizza.  I think I could eat pizza every day and not get tired of it.  But it has to be the right kind of pizza.  It's a good thing that I only lived in Boulder for less than a year, because the people there seem to have a thing for Chicago-style deep dish pizza, based on the restaurants that I went to.  I suppose that's alright if you like that sort of thing, but I grew up eating real pizza, which is to say, thin crust pizza that comes in enormous slices. =)  The sort of pizza we would order by the slice after football games in high school.  (I admit, I was a band geek in high school; a bunch of us would go out after the games and almost always end up at the same place, eating pizza.)  Whenever I go to visit family on the east coast, I try to eat pizza while I'm there.  Fortunately, Austin is home to a lot of people transplanted from the northeast, so we are lucky enough to have some great pizza places.

I know it's not my usual thing to write about savory dishes on this blog, but I'll defend this post by pointing out that it's still baking. =)  I'm actually surprised that I haven't posted about pizza dough more often, since we eat it almost on a weekly basis.  My one previous post was for a Daring Bakers challenge, and featured a recipe from the Bread Baker's Apprentice.  That one was good, but not my favorite--I had some trouble working with the dough.  Since we eat pizza so often, I've tried a number of different recipes over time.  For a while, one from Cook's Illustrated was my standby.  Lately, though, I've tried a couple from my new Peter Reinhart book, Artisan Breads Every Day.


The most recent one that we've been making is the Neo-Neapolitan Pizza Dough.  The original recipe calls for all bread flour, but I like substituting white whole wheat for part of it.  Reinhart mentions several times in the book that it's possible to substitute whole grain flour for part of the white flour in most of the recipes but that addition water will be needed.  He says to add 1/2 tablespoon (1/4 ounce) of water for each 1 ounce of whole grain flour that you substitute.  I made my pizza dough with 4 ounces of white whole wheat flour, so I added 1 ounce of extra water.  (So 20 ounces of bread flour, 4 ounces of white whole wheat flour, and 18 ounces of water.)  The recipe has olive oil and sweetener (sugar, honey or agave syrup) as optional additions.  I used the sweetener once, but found that the crust darkened too quickly (totally burned one pizza) so now I skip it.  I do add the oil.  

The recipe says that the dough should be refrigerated overnight before using it.  I've actually been making it in the morning, portioning it into balls for individual pizzas, and putting the dough balls in the fridge to ferment during the day.  It seems to work quite well.  I also like the fact that the dough makes a lot--I make 6 portions of dough at 7 ounces each.  Three of them go into the fridge to be used that evening, and the other three go directly into the freezer to save for the following week.  Jamie and I each make our own pizzas and the girls share one.  The nice thing about individual pizzas is that everyone can have the toppings that they like. =)


I'm the boring one.  I prefer just sauce and cheese on mine.  We use whole milk mozzarella (the kind you buy in blocks, not fresh mozzarella) because it has a much nicer texture than part-skim.  We just try not to go crazy with it. =)  I also add some freshly grated parmesan on top.  Occasionally I'll also sauté some mushrooms to add to mine.  Jamie is much more adventurous in his toppings.  He usually has pepperoni (we always use turkey pepperoni--Jamie says it tastes just as good but is much less greasy).  He also adds olives (sometimes black, lately green) and mushrooms.  He likes spicy things too, so he often adds some crushed red pepper flakes or adds a bit of hot sauce to his sauce.  And he prefers romano to parmesan.  The girls mostly go with cheese, sometimes adding pepperoni.  When we were making the pizza that I photographed, we were low on pepperoni, so they had salami instead.  I put Brianna to work cutting it into smaller pieces.  Both Brianna and Gillian like helping add stuff to their pizza. =)

With some of the previous recipes I've made, we would pre-bake the crust for a minute or two, then add the toppings and finish baking.  With this dough, though, the bottom was getting too brown when I did that.  But even with cornmeal on the peel, the dough tends to stick to it when we add sauce and toppings to the raw dough.  So I've started doing things another way.  I put a sheet of parchment paper on the peel and put the dough on top of that, then add toppings.  The pizza then goes into the oven, parchment and all.  It's a good idea to pull the parchment out after a minute or two of baking, once the crust has set on the bottom.  Otherwise, it tends to get rather charred around the edges, from baking at 550F for too long. =)  The pizzas bake for 5-7 minutes each, depending on the amount of toppings.


The verdict?  I think I have a new favorite dough!  We've made this one a couple times now, and I really like how it turns out, from both fresh and frozen dough.  The whole wheat adds a nice flavor.  Most of the crust is thin and crisp on the bottom, while the edges are chewier, with some nice bubbles.  

If you'd like to try this recipe for yourself, you can find it here.  But I highly recommend getting a copy of Artisan Breads Every Day--there are many other wonderful recipes to try.  And if you're a huge pizza fan, it's worth getting your hands on a copy of Peter Reinhart's pizza book, American Pie.  I was lucky enough to be able to borrow it from my library, and I'll definitely be buying my own copy at some point.

One last thing, this pizza has been submitted to Yeastspotting!