Pages

Saturday, November 29, 2008

Sweet Caramel...


...Good times never seemed so good...

Thanks to this month's Daring Bakers challenge, now you, too, can have Neil Diamond stuck in your head all day. =)  After a couple months of savory challenges, we're back to sugar.  More specifically, caramel!  

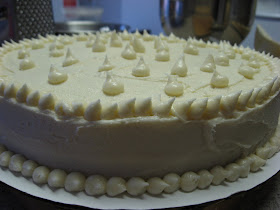
I recently discovered the joys of salted caramel, so I was happy with this month's challenge.  We had to make Caramel Cake with Caramelized Butter Frosting from a recipe by Shuna Fish Lydon.  Aside from having to make both the cake and frosting recipes, we were given a lot of freedom in this challenge--we could choose any shape, size, flavorings and decorations that we wanted.  I thought about making cupcakes, but in the end, decided to make a traditional layer cake.

The first step was to make caramel syrup, since it was an ingredient in both the cake and frosting.  After my past misadventures with caramel, I was particularly careful while making the syrup.  After reading Shuna's additional tips on the Daring Bakers board, I went ahead and added a bit of corn syrup to the water and sugar mixture for a little added insurance.  And when it came time to add the water to the caramelized mixture, I used a tip from Linda of Linda's Window.  She recommended cutting a hole in a sheet of aluminum foil, laying the foil on top of the pan, and pouring the water through the hole.  Worked like a charm to avoid being splattered with molten sugar.  Once I was done, I realized that I probably should have let the syrup get a bit darker, but it had a lovely caramel flavor.


On to the cake...  The batter was pretty straightforward to mix.  The recipe cautions that all the ingredients should be at room temperature, so I made sure to take everything out of the fridge ahead of time.  I baked my cake in a 9" x 3" round pan coated with baking spray (Pam for Baking is my friend) and lined with parchment.  I baked it for a total of 40 minutes, and it came out great.  The cake was a bit domed when I took it out of the oven, but as it cooled, the top settled until it was level. 

Next came the frosting.  A major component of the frosting is browned butter.  I melted my butter in a heavy saucepan, watching carefully so I wouldn't burn it.  Once I could see the bits of milk solids on the bottom of the pan turning golden, I turned off the heat and let it sit until it got just a bit darker (the residual heat of the pan is enough to keep it going for a bit).  Then I poured the butter through a coffee filter into a heat proof bowl.  I knew that I wanted a firm frosting rather than a looser icing, so after the butter had cooled on the counter a bit, I put it in the fridge so it would solidify.  Then I put it in my stand mixer and used the paddle to beat in the other ingredients.  I ended up using the full amount of powdered sugar (16 ounces), 4 tablespoons of heavy cream, 3 tablespoons of caramel syrup, about a teaspoon of vanilla, and a scant teaspooon of kosher salt (sounds like a lot, but it tasted great).  


To assemble the cake, I used my serrated knife to carefully slice the cake in half.  I put a thin layer of frosting between the cake layers and then frosted the top and sides of the cake, again not making the frosting too thick.  My decorating skills need some work, but it came out okay. =)

The verdict?  I only got a small taste of the finished cake, since I gave it away.  I took it to Gillian's daycare as a treat for all the teachers right before Thanksgiving.  They cut into it immediately and offered me a piece.  The cake was delicious.  Very moist, and with a dense texture.  I expected that, since the ingredient proportions were very similar to a poundcake.  Although a number of other Daring Bakers thought the cake was too sweet, I thought it was fine.  The frosting was definitely very sweet, but in a small piece, it complemented the cake nicely.  The browned butter gave it a wonderful flavor, and I loved the mix of salty and sweet.  I would happily make both again, although I'd probably use less powdered sugar in the frosting.  

Oh, and I forgot to mention...  The leftover caramel syrup is wonderful in tea. =)

Be sure to check out the Daring Bakers blogroll for more wonderful caramel cakes.  Shuna Fish Lydon’s recipe can be found here.  And thanks to this month's hosts, Dolores of Chronicles in Culinary Curiosity, Alex of Blondie and Brownie, and Jenny of Foray into Food (plus assistance with alternative baking questions from Natalie of Gluten-a-Go-Go).  

Friday, November 28, 2008

Friday with Dorie


This has been an odd week.  Usually I'm sitting here on Monday night trying to finish up my TWD post so I can get to bed.  But this week, because of the holiday, our fearless leader, Laurie, allowed us to post late, which I appreciate, since I didn't even make the recipe until yesterday.  Nothing like leaving your holiday baking to the last minute... =)

I don't really like pumpkin pie.  I like lots of other pumpkin things, but don't really like the custardy texture of the pie.  (Yes, texture again, just like with the rice pudding.)  And pecan pie doesn't appeal much either--too sweet.  But my husband Jamie likes both, so I figured that he would help me eat this week's TWD recipe--Thanksgiving Twofer Pie.  Basically, the idea is that you put pecan pie filling on top of pumpkin pie filling, and hopefully make everyone happy.  =)

One nice feature of baking later in the week is that I was able to check out some of the cool things that other people did.  One that particularly caught my eye was Pink Stripes.  I really liked the idea of making mini pies, since I love crust, and that way if I didn't like the filling there wouldn't be as much of it. =)  For the crust, I used a favorite recipe of mine from Cooks Illustrated.  For those who subscribe to the website, it can be found here.  It's an all-butter crust that uses the technique of fraisage (smearing the dough against the counter) to make a strong, flaky crust.  After the dough chilled, I rolled it out and used my biggest round cutter (about 3 3/4 inches in diameter) to cut out circles of dough.  I carefully pressed them into the cups of a muffin tin that I had sprayed with baking spray (Pam for Baking, Cathy!)  I then put the muffin tin in the freezer while I prepared the fillings.  

I pretty much followed the recipe for the fillings.  The pumpkin one came together quickly in the food processor.  I did make one change to the pecan mixture, which was to use Lyle's Golden Syrup instead of corn syrup.  I spooned the pumpkin mixture into each of the muffins cups.  For most of them, I made sure to leave room for the pecan mixture, but I did make two just pumpkin, for my children who don't really like nuts.  =)  Then I placed several pecan halves on top of the pumpkin and spooned the syrupy brown sugar mixture on top, making sure not to fill the cups too much.  Since my ratio of filling to crust was different than in a regular pie, I had some of the filling mixtures left over, so I filled a couple of 4-ounce ramekins with the excess.  


I deliberately didn't pre-bake the crusts, since I didn't want the top edges to brown too much.  So to make sure that the bottoms browned well and didn't get soggy, I placed the muffin tin directly on my preheated baking stone.  I baked my mini pies for 10 minutes at 45o degrees F, and then turned the temperature down to 300 degrees F and baked them for another 20 minutes.  They turned out great.  I let the pies cool for a few minutes in the pan, but then carefully loosened them and transferred them to a rack to cool completely.  I was afraid that if I left them in the pan, they'd get stuck.  

The verdict?  I was surprised to find that I really liked the combination!  This was definitely a case of the result being more than the sum of the parts.  And I liked the mini pie variation a lot.  As expected, Jamie liked them a lot, too.  We had Thanksgiving dinner with some friends of ours, and they seemed to enjoy them as well.  At least, they didn't complain when I offered to leave some of the extra pies there! =)

Thanks to Vibi of La Casserole Carrée for choosing this week's recipe.  Even though she's not American, she was kind enough to select something that the American members of Tuesdays with Dorie could make for the Thanksgiving holiday.  You can find the recipe here, on Vibi's blog, or of course in Baking From My Home to Yours.  

Thursday, November 27, 2008

Happy Thanksgiving!


Just a quick post for now, since I really need to get my baking finished.  Stay tuned later today or tomorrow morning for some Two-fer Pie.  The pie crust dough is waiting for me in the fridge.  And I made enough to make my favorite apple pie (coming soon as well).  

Meanwhile, we had to figure out something for breakfast.  I wish I had seen these pumpkin pancakes over at PheMOMenon sooner; I might have made them.  As it was, I turned to our usual standby, muffins.  I wasn't in the mood for any of our usual recipes, so I went looking for a new recipe.  I started with Dorie, but nothing jumped out at me.  So I turned to my other trusted source, King Arthur Flour, and found a recipe for Doughnut Muffins.  (If you haven't seen their great blog, go check it out!)  Best of all, it didn't call for anything that I don't have (like buttermilk--I never seem to have it when I need it).  

The recipe says that you can use either all-purpose or white whole wheat flour.  I used half of each (1 1/4 cups, or 5 5/8 ounces).  I kind of eyeballed the nutmeg, since I was grating it.  Time to hit the bulk department--I'm down to my last nutmeg.  Oh, and if you've never tried it, a microplane grater works well for nutmeg.  The batter wasn't as thick as I normally expect it to be for muffins.  That's probably why they have such a domed shape when they're done.  I let the muffins sit in the pan for a couple minutes, then brushed the tops with melted butter and sprinkled them liberally with cinnamon sugar.  


The verdict?  Yummy!  I ate mine plain, but I bet they would be good with some jam.  Ooh, or maybe I can try putting the jam inside--jelly doughnut muffins, anyone?  =)  Brianna ate all of hers, and Gillian ate the top off hers and played with the rest.  I definitely think these will make another appearance, especially since they're quite easy to make.

One more thing to share...  Brianna will be able to enjoy her Thanksgiving dinner more, now that she's finally lost her first tooth.  It took 2 1/2 weeks before it finally got so loose that she was willing to let me wiggle it out Tuesday night.  She won't have to eat quite so carefully now. =)  Happy Thanksgiving, everyone!

Sunday, November 23, 2008

Turn of the century


Everyone has heard of pregnant women having cravings for or aversions to certain foods.  I fortunately didn't have too many problems with that in either of my pregnancies.  The only aversion I really had was to most meat when I was pregnant with Brianna.  It wasn't a problem with Gillian.  And with Gillian, I had a thing for mint chocolate chip ice cream (HEB Creamy Creations, for those of you in Texas).  I had a scoop of it just about every day for several months.  We're talking quite a few gallons all together (I don't really want to think too hard about the total).  And now, while I do like it once in a while, I can definitely live without it.  

When I was grocery shopping at Central Market Friday night, I was reminded of a craving I had during the last month of my pregnancy with Brianna.  I don't normally like really sweet things.  I'd rather eat chocolate. =)  But I ate Nestle butterscotch chips by the handful.  I went through several bags.  Most of the time, I can hardly stand to look at them, since they're so sweet.  Well, what I found was a display of several flavors of Guittard chips that I hadn't seen before.  Butterscotch, Green Mint, and Cappucino.  I don't really like coffee-flavored things, so I wasn't tempted by the cappucino ones.  I did think about grabbing a bag of the mint ones, to put in something chocolate.  But a bag of the butterscotch ones immediately jumped into my cart.  =)  Honestly, I think I'm going back for more, maybe tomorrow--they are full 12-ounce bags, for $1.69 each!


As soon as I got home, I opened the bag for a taste.  Wow.  Very smooth and creamy.  Sweet, but not overpoweringly so.  I started trying to figure out what to make with them, so I wouldn't just eat them all out of the bag.  My first thought was Oatmeal Scotchies.  I haven't had them in forever.  I was all set to make the dough last night, when I discovered a problem--I only had about a cup of oatmeal.  Oops.  So I thought some more.  I had pecans, which I thought would be good with the chips.  And I've been playing around with my standard chocolate chip cookie recipe, adding whole wheat flour to it.  So here's what I came up with:

Butterscotch Pecan Cookies

1 cup (2 sticks) unsalted butter, softened
3/4 cup granulated sugar
3/4 cup packed light brown sugar
1 tsp vanilla
1 egg
1 1/2 cups (6 3/4 ounces) all-purpose flour (I use King Arthur)
3/4 cup (3 3/8 ounces) white whole wheat flour (King Arthur here, too)
1/2 teaspoon table salt
1 teaspoon baking soda
3/4 cup coarsely chopped pecans, toasted
1 1/2 cups butterscotch chips

You can mix the dough in a stand mixer, but I usually just use a large mixing bowl and a wooden spoon.  Cream together the sugars and butter.  Beat in the vanilla and egg.  Mix in the flours, salt and baking soda.  The dough will be stiff.  Stir in the nuts and butterscotch chips.  You can use the dough right away, but I prefer to refrigerate it at least overnight.  

If the dough is chilled, take it out of the fridge so that it can soften a bit while you preheat the oven to 375 degrees F.  Line a heavy baking sheet with parchment paper.  I use a #70 disher (which holds about 2 teaspoons) to scoop the dough onto the baking sheet.  Bake for 11-13 minutes, until the edges are golden brown.  Let the cookies rest on the pan for about 5 minutes before transferring them to a rack to cool completely.  Yields 5 dozen cookies (about 2 1/2 inches in diameter).  


The verdict?  Delicious!  Not too sweet.  The toasted pecans add a really nice touch.  Jamie really liked them; not surprising, since he loves butterscotch.  Both girls ate them as well, although Brianna had to complain about the pecans first.  =)  I think most of these are heading out the door to other people so I don't eat them all.  

Oh, and the post title?  This is my 100th post!  I'm amazed at how much my blog has evolved since I started.  My pictures are a lot better, for one thing. =)  And next month is my blogiversary, so I'm trying to come up with a good way to celebrate.  I don't know what I was thinking, starting it two days before Christmas.  Like people with birthdays on or near Christmas, I don't want it to get overlooked because of the timing. =)  We'll see...


Tuesday, November 18, 2008

Black and white and rice all over


Okay, let me just come out and say it...  I'm a picky eater.  I always have been.  I will say that I've gotten better as I've gotten older.  I'm generally willing to try something at least once.  And there are quite a few things that I wouldn't eat as a child that I like or am at least okay with now.  There are some things that I won't eat because I just don't like the flavor (coconut being a big one).  But I've come to realize that for most of the things I dislike, it's the texture that gets to me.  

One big category of things I don't care for is hot cereal-type dishes.  Oatmeal.  Cream of wheat.  Polenta.  (Though I want to like that one, so I occasionally give it another try.)  And rice pudding.  Which is unfortunate, since this week's Tuesdays with Dorie recipe is Arborio Rice Pudding, White, Black (or Both), chosen by Isabelle of Les Gourmandises d'Isa.  Dorie's recipe does have a few things going for it.  It uses arborio rice, which I do like.  And there's a chocolate version, so how could it be all bad?  My husband does like rice pudding, so I figured if I made it, at least he'd eat it.  

I still almost bailed on this one.  Not so much because I wasn't sure I would like it, but more because I wasn't sure I had the time to make it.  It takes over an hour to cook, and unlike last week's Kugelhopf, you actually have to pay a fair bit of attention to it for most of that time.  And then it has to chill for quite a while (the recipe says at least 6 hours).  I worked all day Saturday.  I ran out of time on Sunday.  And I knew I had to work late on Monday.  It wasn't looking too good...


But I managed to squeeze it in.  Since I was working later on Monday, I didn't have to go in until after 10:00.  I took Brianna to school and Gillian to daycare, and then headed home to finish getting my stuff ready for work.  I had just enough time to make the pudding.  Well, almost.  It was going to be close, so I didn't even bother with trying to cook it on low.  I let it bubble away over medium heat, skimming the top as needed.  It thickened up nicely in about 45 minutes.  I made a few changes to the ingredients, too.  I didn't have quite enough whole milk, so I used 2 cups of whole milk and 1 cup of 1% milk (only 3 cups total, instead of 3 1/4).  I added a bit of salt, as well.  I split the finished pudding between 2 different containers and added some vanilla extract to one (maybe a teaspoon), and 1 1/2 ounces of chocolate (58% Ghirardelli pieces) to the other.  

The verdict?  Well, I didn't hate it.  But I'm not sure how much I like it.  The flavor of both versions is great.  It's that darn texture thing that's still turning me off.  Gillian ate a bite or two, but that's all.  She was pretty tired, though, so she might eat more another time.  Brianna didn't like the rice.  She wanted to know if I could dish some up for her without the rice.  Sorry, not gonna work with this one... =)  I'll have to make her some regular pudding this weekend to make up for it.  Jamie, as predicted, liked both versions.  

Will I make this again?  Probably not, unless I get a special request.  But I'm glad I gave it a try.  For the full recipe, head on over to Isa's blog.  And to see how the rest of the TWD bakers fared, checkout the Tuesdays with Dorie page for links to the various blogs.  


Sunday, November 16, 2008

Chocolate Moose


We have a lot of books in our house. Every time I've moved, I've always vastly underestimated the number of boxes it will take to contain all the books. We have bookshelves, but not nearly enough. Honestly, I don't actually know how many there are. There are cookbooks, of course, but all sorts of other books as well. I have books. Jamie has books. Even at their young ages, Brianna and Gillian have books--board books, early reader books, lots of books.

Anyone with small children nowadays has probably encountered the Laura Numeroff "If You Give..." series. We have several. The one that came to mind this morning was If You Give a Moose a Muffin. We're big weekend muffin eaters around here. The recipes are pretty quick to make, come in all sorts of flavors, and make enough to eat for several days during the week as well. When I was trying to figure out what to make this morning, I asked Brianna what kind of muffins she wanted. She said chocolate. I think she really meant chocolate chip, but I decided to go all the way.


I have several cookbooks that contain chocolate muffin recipes. But the first couple I checked didn't just jump off the page and say "Make me!" So I turned to the internet and one of my favorite sources for recipes, King Arthur. I quickly found a recipe for Chocolate Breakfast Muffins that looked like a good starting place. The recipe follows the muffin method--separately mix together the dry and wet ingredients, then quickly combine them and immediately pan and bake. I did make a few changes--the main one as to substitute white whole wheat flour for part of the all-purpose flour.  The online recipe calls for dutch-processed cocoa, but all I had was natural cocoa, so I decided to give it a try.  Brianna was happy to help, giving her the opportunity to use her cool new spatula. =)  The recipe says it makes 12 muffins with large mushroomed tops; I made 12 regular muffins and 12 minis.  I baked the standard ones for about 16 minutes and the minis for 10 minutes.  When they were done and had cooled for a bit, I finished them with a drizzle of cream cheese icing.  


The verdict?  Definitely a hit!  We'll be making these again.  Very chocolately, but not overly sweet.  The whole wheat flour wasn't noticeable, so score one for mom getting healthy stuff into the kids without them noticing. =)  

Here are the changes that I made to the ingredients.  I followed the method listed in the recipe link above.  After making the muffins, I actually thought to look in my copy of the King Arthur Baker's Companion, and found the recipe there as well.  It said that either type of cocoa was fine, so I guess my substitution was okay. =)  

Chocolate Breakfast Muffins

2/3 cup (2 ounces) natural cocoa (I used Hershey's)
1 cup (4 1/4 ounces) unbleached all-purpose flour
3/4 cup (3 ounces) white whole wheat flour
1 1/4 cup (9 3/8 ounces) light brown sugar
1 teaspoon baking powder
1 teaspoon baking soda
3/4 teaspoon table salt
3/4 cup (4 1/2 ounces) chocolate chips
2 eggs
1 cup (8 ounces) milk (I used 1%)
1 teaspoon vanilla
2 teaspoons vinegar (I used white wine vinegar because it's what I had)
8 tablespoons (4 ounces; 1 stick) unsalted butter, melted

For the icing, I whisked together the following and drizzled it over the muffins:

1 tablespoon cream cheese, softened
1/2 cup (2 ounces) powdered sugar
2 teaspoons milk


Tuesday, November 11, 2008

It's a bread! It's a cake! It's Kugelhopf!


One of the things I love about Tuesdays with Dorie is that it makes me bake things that I might not otherwise try for a long time.  Who knows how long I would have been intimidated by brioche if it hadn't been for Peabody and the Brioche Raisin Snails? =)  And after making brioche (twice, since we also made Sticky Buns),  kugelhopf wasn't bad at all.  


Both brioche and kugelhopf are yeast breads enriched with butter and eggs.  But for the kugelhopf, I got to buy a cool new pan!  Dorie says that the cake can be made in a regular bundt pan in a pinch, but I'm not all that thrilled with the bundt pan I have, and I've been looking for a good reason to invest in a better one.  So on our way home from grocery shopping Friday night, Brianna and I stopped by Sur la Table.  We also came away with one of these for Brianna.   (Chocolatechic, that one's for you. =)  )


This recipe is definitely not a quick, throw-it-together-at-the-last-minute sort of thing.  First you have to mix and knead the dough, which can take a while (though at least your mixer can do most of the work).  Then it can take a couple hours to rise, which isn't surprising with an enriched dough like this.  Then into the fridge it goes for an overnight rest.  In the morning, you transfer the dough to a kugelhopf or other pan and let it rise again.  Since the dough is so cold to start, I definitely recommend finding a nice warm spot for it.  Warming up your oven just a bit then turning it off before placing the pan inside works quite well.  Once the dough has risen almost to the top of the pan, you take it out to preheat the oven.  The actual baking time isn't too bad--about 25 minutes for mine.  The only problem I had was that there wasn't really enough dough for my mixer to knead well.  I think I'd be better off doubling the recipe and then freezing half the dough for later.  

A few notes I forgot when I was writing this last night...  I used 4 1/2 ounces as my weight for a cup of flour.  I used instant yeast instead of active dry, and cut it back to about a teaspoon.  Since I was using instant yeast, I mostly ignored Dorie's mixing instructions.  I mixed the dry ingredients together in my mixer with the paddle.  Then I whisked the milk and eggs together and mixed them into the flour mixture.  I switched to the dough hook and worked in the butter, then kneaded the dough for about 10 minutes.  Then I stirred in the raisins.


The verdict?  I really enjoyed it.  Brianna tasted it, but didn't care for it; no surprise there.  Gillian liked it just fine.   Jamie liked it, but expected it to be sweeter.  Of course, maybe it would have been if I hadn't forgotten to put the powdered sugar on it.  Oops.  I'd like to try a few changes next time, though.  I think a bit of nutmeg in the dough would be tasty.  And it definitely needed more raisins (or other dried fruit, for all you raisin-haters =) ).  I did try Dorie's suggestion of toasting some leftover bread/cake and putting jam on it--that was really tasty.

This week's recipe was chosen by Yolanda of The All-Purpose Girl.  You can find the recipe on her blog.  And don't forget to head on over to the TWD blogroll to see how everyone else fared this week!


Sunday, November 9, 2008

Worth its salt


For all the baking I do, I don't have a taste for really sweet stuff. I love chocolate, and all things bread.  But things that are just sweet don't hold much appeal for me.  Case in point, caramel.  I admit, it's pretty tasty, but I could generally take it or leave it.  No more.  And all because of a little salt.

I've seen a variety of references to salted butter caramel on different food blogs.  So last month when I was making Dorie's Caramel Peanut (Pecan) Topped Brownie Cake, I added a bit of kosher salt to the cream when I was making the caramel.  The cake was okay, but the leftover caramel was outstanding.  I had no idea adding salt to something could make it so addictive.  I more or less ate the leftover caramel with a spoon (over a period of days, at least, not all in one sitting!).  My husband will undoubtedly be amused when he reads this, since he's long been a fan of the sweet/salty combination. =)

Where am I going with this?  We had a get-together for work this weekend.  As is often the case, I volunteered to make dessert.  When I asked my boss what she would like, she thought for a bit.  And then she had a brainstorm--"I've got it!  Can you make pumpkin cheesecake?  But  sort of a turtle cheesecake, with chocolate and caramel?"  Of course I can!


My favorite cheesecake recipe is from Rose Levy Beranbaum.  The recipe is in The Cake Bible, but I usually make the version she offered in Fine Cooking back in 1999, which is basically the same except that it uses 6 yolks in place of 3 whole eggs.  In that same Fine Cooking article, she gave a pumpkin cheesecake recipe as well, but I'd never tried it.  I wanted to make a chocolate crust, but instead of using a crumb crust, I decided to go with a chocolate pâte sucrée, since I find that crumb crusts on cheesecake tend to get soggy.  I blind baked it and then spread a layer of caramel on top of the crust before pouring in the batter.  

The verdict?  Everyone seemed to really enjoy it.  The cheesecake was creamy and delicious.  The pumpkin wasn't overpowering, and it was nice to have it on its own, with no distracting spices.  The caramel layer got a bit too liquidy, so it started to leak out once I'd cut the first piece of cheesecake.  It was definitely tasty, though.  The crust worked well in that it was definitely not soggy.  I think I'll add a bit more salt to both the crust and filling next time.  I had leftover caramel, so I drizzled some on each piece as it was cut.  And there are still a few spoonfuls left for me. =)  


The recipe for the cheesecake filling can be found here.  For the crust, I used the chocolate pâte sucrée recipe from The Pie and Pastry Bible, but any similar recipe should work just fine.  For the caramel that was layered under the cheesecake filling and drizzled over the top, I used the caramel from Dorie Greenspan's Caramel Peanut Topped Brownie Cake as a starting point and changed it around a bit.  Here's my version of it.

Salted Caramel Sauce

1/4 cup plus 2 tablespoons (3 ounces) water
1 1/2 cups (10 1/2 ounces) granulated sugar
1 tablespoon light corn syrup
2/3 cup heavy cream
1/4 teaspoon kosher salt
2 tablespoons cold unsalted butter, cut into four pieces

Place the water in a heavy saucepan.  Pour the sugar into the center of the water, slowly enough that it all gets wet as you add it.  Stir in the corn syrup.  Put a lid on the pan and heat the mixture over medium high heat until it boils.  Meanwhile, put the cream in a measuring cup with a spout and stir in the kosher salt.  Once the sugar syrup is boiling (you'll be able to tell because you can see steam escaping from under the lid), you can remove the lid.  As the water boils off, the syrup will get thicker and the bubbles will get bigger.  Continue heating until the syrup starts to turn amber.  Once it reaches the color you want (too pale and it won't taste as good, but too dark and it'll be bitter), remove the pan from the heat.  Very carefully and somewhat slowly, add the cream to the pan.  The mixture will bubble extremely vigorously--stay back so you don't get scalded by the steam.  Once the bubbles subside a bit, stir the mixture until smooth.  Add the butter pieces and stir until they have melted and blended into the caramel.  Pour the caramel into a heatproof container.  Allow it to cool until just warm before refrigerating.   


Saturday, November 8, 2008

Long overdue...


I feel really bad about putting this off for so long...  I've been lucky enough to receive several blog awards in the past couple of months, but I haven't done anything to acknowledge them or pass them on.  I swear, there just aren't enough hours in the day.  *sigh*  I still haven't really had a chance to figure out who to pass these on to, but I did at least want to thank the givers...

The first one (and I'm embarrassed to admit how long ago it was) came from Pamela of Cookies with Boys:

  
The next one was also from Pamela, and then later I received it again from Christine of Blenders Galore.  Right back at both of you!


The third award came from Nancy of The Dogs Eat the Crumbs, and I really appreciate it.  There are many excellent blogs out there, and I'm amazed that Nancy would consider me among them.  


And most recently, Lisa of Magic Sprinkles was kind enough to share this one with me.  Again, I really appreciate it that she considers my efforts to be creative.


Thank you again to all of you.  I hope to have time soon to update this and pass these awards on to some other great bloggers.  

Tuesday, November 4, 2008

Three of a kind


Some weeks my Tuesdays with Dorie baking goes better than others.  And sometimes the blog writing is easier than others...  This week's Rugelach recipe was chosen by Grace of Piggy's Cooking Journal.  I've seen recipes for Rugelach a number of times, but I've never actually made them.  I had time last week, so I made the recipe early for once.  I had mixed success with it.  I'm a bit of a perfectionist, so part of me really, really wanted to make these again.  The rest of me was just too tired.  

A large part of my problems this week stemmed from not reading the recipe closely enough.  As a result, I put too much salt in the dough.  It wasn't horrible, but it was definitely a little too salty, especially since the dough doesn't have any sugar in it.  I decided before I started that I wasn't going to use all of Dorie's filling ingredients in each cookie.  For one thing, my kiddos wouldn't eat them.  So I decided to divide the dough into three portions and put different fillings in each.  I went with raspberry fruit butter for one, mini chocolate chips for another, and a mix of brown sugar, cinnamon and pecans in the third.  I topped them all with some turbinado sugar.

The crescent shape may be traditional, but it looked like it could get pretty messy.  And I was looking at another rugelach recipe over at Fine Cooking, which gave me the idea to just roll the dough jellyroll-style and cut it like cinnamon rolls.  =)  That went fine, but then I didn't pay attention and didn't realize I was supposed to chill the filled dough before baking.  I think that's why I had some problems with the cookies shrinking (think pie crust that isn't chilled enough before baking).  

The verdict?  Not bad, but I know I can do better.  My favorite was definitely the pecan filling.  Brianna's was the chocolate chip.  No surprise there.  The raspberry filling was good, but not sweet enough with the dough.  Ooh, now that I think about it, I should have tried the raspberry and chocolate together!  Next time...  I don't know how traditional it is, but next time I'll also add a bit of sugar to the pastry dough.  And not be in such a big hurry to get the cookies into the oven.  =)  

This recipe lends itself to lots of variation, so be sure to head over to check out the TWD blogroll to see what everyone else has come up with.  And you can find the recipe over at Grace's blog.

Sunday, November 2, 2008

Equal time


I figured it was time to give Brianna some airtime.  With her birthday being only a few weeks past, Gillian's been getting a lot of attention, both on my blog and in general.  Brianna's pretty put out because Gillian keeps getting packages in the mail that turn out to be new toys.  Never mind the fact that they're toys aimed at 2-year-olds; Brianna wants to play with them because they're new and they're Gillian's.  Which of course has led to lots of squabbling around here.

With the time change this morning, I was afraid that they'd both be up at the crack of dawn, but it wasn't as bad as I feared.  Brianna made it to almost 7 o'clock (new time).  Since Gillian was still asleep, we headed downstairs so Brianna could watch cartoons and I could contemplate what to make for breakfast.  Muffins are something I often turn to on Sunday mornings, since they're pretty quick to mix together and make enough so I have breakfast during the week.  I asked Brianna what kind she would like.  She immediately said that she wanted me to make the pumpkin ones again, with the chocolate chips.  I was kind of hoping to try something new, but she was really insistent.  I couldn't really complain--she was volunteering to eat something fairly healthy.  =)  


I did change things up a little bit.  As with the last time I made them, I used half all-purpose flour and half white whole wheat.  Unlike last time, I didn't increase the salt (though I should have).  I didn't have any buttermilk (well, there's some in my fridge, but it's way past the sell-by date and really needs to go away), so I substituted sour cream.  I did the whole batch as chocolate chip, mixing in 1/4 cup of mini chips.  When I was checking out everyone else's TWD pumpkin muffins, I ran across several with streusel on top.  That sounded like a good idea to me.  So I looked through my copy of Great Coffeecakes, Sticky Buns, Muffins & More for some ideas.  I found a recipe for a Brown Sugar Whole Wheat Streusel that looked like it would be a good match for these muffins.  I cut it back a bit, since the original recipe made enough for 16 muffins and I was only making a dozen.


Brianna was going to help me with the whole thing, but she threw a major tantrum (an all too frequent occurrence of late) over which one of us was going to spray the muffin tin with baking spray.  She was temporarily banished to her room, but was allowed out in time to add the chocolate chips and put the streusel on top of the muffin batter.  We baked the muffins for 20 minutes, let them cool in the pan for about 5 minutes, and then held out for another 10 minutes or so.

The verdict?  The streusel was definitely a good addition.  The muffins did need more salt, but they were still good.  Brianna really enjoyed hers.  I don't know if they've replaced the coffeecake muffins as her favorite, but they're up there.  If you want to give them a try, you can find the original pumpkin muffin recipe here.  The streusel is available here on Carole Walter's website.  Here are the ingredients I used:

Muffins:
1 cup (4 1/2 ounces) all-purpose flour
1 cup (4 1/2 ounces) white whole wheat flour
2 teaspoons baking powder
1/4 teaspoon baking soda
1/2 teaspoon salt
3/4 teaspoon ground cinnamon
1/2 teaspoon ground ginger
1/8 teaspoon freshly grated nutmeg
1 stick (8 tablespoons) unsalted butter, at room temp.
1/2 cup sugar
1/4 cup (packed) light brown sugar
2 large eggs
1/2 teaspoon vanilla extract
3/4 cup canned unsweetened pumpkin puree
1/4 cup sour cream
1/4 cup mini chocolate chips

Streusel:
1/4 cup (1/2 stick) unsalted butter
1/3 cup rolled oats
1/4 cup light brown sugar
1/4 cup white whole wheat flour
1/4 cup all-purpose flour
1/2 teaspoon cinnamon
1/4 teaspoon salt