Pages

Wednesday, May 28, 2008

Layers


I was reading a couple of posts in the last day or two that really hit home for me.  One was Clara's post for this week's Tuesdays with Dorie recipe.  She mentions that this week she realized just how much she's learned over the past few months.  The other was a recent post of Jayne's where she talks about the great payoff we get from making things ourselves, from scratch.  

I couldn't agree more with both of them.   What a difference a few months makes.  When I first started this blog and then later joined both Tuesdays with Dorie and the Daring Bakers, I wasn't very sure of myself.  I was pretty good at baking, but not all that adventurous.  The name of my blog comes from the paper notebook that I use to record my baking (and sometimes cooking) notes.  I've had it for just over three years.  I've filled as many pages in the last six months as I did in the previous two and a half years.  Wow.  

I'm used to getting compliments when I bring baked goods to work or other events.  But now it's at a whole new level.  People are just amazed that I would make some of these things myself, and from scratch.  I'm kind of amazed myself.  =)  And at the same time, I can't believe the number of talented bakers there are out there, telling the world about their creations.  The more I read other blogs, the more I'm inspired to put my own twist on things.  And take cool pictures while I'm at it.  

All of this musing was set off by my needing to write about this month's Daring Bakers creation, Opera Cake.  With a twist.  Traditional opera cake is made with flavors of dark chocolate and coffee.  Our hosts for this month decided to challenge everyone with something a bit different--white chocolate and light colors and flavors.  This recipe is a great example of how I've grown.  White chocolate isn't my favorite and I don't particularly like almonds, so I would normally pass right on by this one.  But I gave it a shot.  And with all of the things I've made recently, the batter for the joconde and the mousse and buttercream didn't faze me at all. I was very pleased with the final result.  


We were allowed to make our own choices as far as flavorings were concerned, as long as the result was light in color and flavor.  I knew immediately that I would go with my favorite, raspberry, for the mousse and buttercream.  I didn't add any flavoring to the cake layers other than the syrup used to moisten the cake.  I chose to use vanilla for that.  

The only real challenge I had with the cake was the fact that I only had one sheet pan that was the right size.  I had to bake the layers one at a time.  Fortunately, since the baking time was so short, the remaining batter didn't deflate too much while the first layer was baking.  The syrup was quick to put together.  I didn't have a chance to look for vanilla beans, so I used vanilla extract for it.  

I have to admit, I was quite confused by the recipe for the buttercream.  There were several corrections posted to the original recipe, and I wasn't sure which version to go with.  In the end, I exercised my option to use another buttercream, and used the one from March's Perfect Party Cake.  To flavor it with raspberry, I first tried substituting 1/4 cup of raspberry puree for the lemon juice.  That gave it a lovely pink color but not enough flavor.  So I added about three tablespoons of some amazing raspberry fruit butter (think jam but more intense).  The buttercream ended up being my favorite individual component.

I used the raspberry fruit butter for the mousse as well.  I started by melting some El Rey white chocolate disks with the cream.  My ganache tried to break, so I ended up adding a bit more cream and managed to whisk it together.  Then I whisked in the fruit butter (3-4 tablespoons) and folded in the whipped cream.  While I loved the flavor of the buttercream, the mousse was my favorite in texture.


Assembly went as directed, with no problems.  I put the cake in the fridge to chill before adding the glaze.  I did make a small modification there.  I just don't like white chocolate enough to put fourteen ounces of it on top of a cake.  So I only made half the glaze recipe (with more of the El Rey Icoa).  It was enough for a nice layer without being too thick.  

I ended up sharing the cake with two different groups.  Both were quite impressed with the finished structure.  And the combination of flavors was really nice.  But that won't stop me from using dark chocolate next time.  Ooh, dark chocolate with the raspberry buttercream--that's something I may have to try.  Yum.

Thanks to our fearless leaders Ivonne and Lis as well as two newer Daring Bakers, Fran and Shea, for hosting this month's challenge.  Check out their blogs for the complete Opera Cake recipe.  And a special mention for Barb of Winos and Foodies. This month's selection is dedicated to her and her support of LiveSTRONG Day, which was May 13th.  


Tuesday, May 27, 2008

A sticky situation (TWD)


Despite what I said last weekend about avoiding time-consuming recipes for breakfast, I did it again.  But it was for a good cause--this week's Tuesdays with Dorie recipe.  What was on the menu this week?  Pecan Honey Sticky Buns, courtesy of Madam Chow's Kitchen.  

As is too often the case, I was getting down to the wire in making the sticky buns.  I had to work Saturday, and we had a wedding to go to on Sunday, so I knew I wouldn't be able to make them before Monday morning (yay! for holidays).  I did remember to start the dough fairly early Sunday evening, so I'd have enough time for it to rise and be "slapped down" in the fridge before I went to bed.  And as with when I made this dough for the Brioche Raisin Snails, thank goodness for my Kitchen Aid mixer!  I know a number of people made the dough by hand, but it is so much easier to just let the mixer do its thing on my counter.  That way I could work on dinner at the same time, pausing occasionally to toss in another piece or two of butter.  

Monday morning I pulled the dough out of the fridge to divide it in half.  I really thought that I'd put the weight of the dough into my notes (in my paper notebook) last time, but I couldn't find it.  The whole batch weighed about 41 ounces.  I set aside half of that for the sticky buns. Last time I used the extra dough to make brioche rolls.  I'm not sure yet what I want to do with the rest of this batch, so I put the second half into a ziploc bag and tossed it into the freezer.  

I knew I didn't want to make 15 or 16 buns, so I decided to go with half and use an 8 inch square pan.  I made half the glaze, and only put pecan halves on about two-thirds of the pan, since I know Brianna doesn't like nuts.  I rolled out the dough that I'd set aside, spread the butter over it, and sprinkled it with the cinnamon sugar.  I had to work quickly, since the dough gets a bit harder to work with as it warms up.  I rolled the dough into a log as directed and used my handy dental floss (regular unwaxed) to cut 8 buns from half of it.  I put the buns cut-side up on top of the glaze in the pan.  I wrapped the rest of the dough log and put it in my freezer for another time.  

I put the pan in the oven, and then realized that I forgot to put it on a sheet pan as Dorie directed.  So I took it back out and put it on the pan before putting it back in the oven.  I wish I'd just left it alone.  At about 25 minutes, the buns looked quite brown on top, and I thought they were done.  After waiting a couple minutes for most of the bubbling to die down, I flipped the buns onto a plate.  That's when I discovered that they weren't as done as I thought.  Argh! The ones in the center, in particular, weren't all the way baked.  I stood there for a minute, trying to figure out what to do.  I decided that they had to go back in.  So you can just imagine me here in my kitchen, trying to figure out how to get the buns back into the pan, glaze-side down, without getting molten sugar all over myself.  I finally managed it with only a small burn on my finger, and stood there, consoling myself by eating the goo left on the plate, while the buns baked for another ten minutes.  They ended up a bit darker than I would have liked, but at least they were cooked.  I swear, I'm going to quit putting pans on another sheet pan to bake, no matter what Dorie says.  Most of the time it just doesn't work for me.


Anyway, the verdict?  I don't know if I'll make this exact recipe again.  I love the brioche dough. I enjoyed the sticky glaze and the pecans.  But the two together were just too rich for my taste. I'd like to make the sticky buns with a different dough (maybe with the one that I used for the cinnamon rolls) to see if I like that better.  And the brioche is fabulous all by itself.  As for the already prepped dough log in my freezer, it'll most likely end up as cinnamon rolls.  

Don't forget to check out the blog roll over at the Tuesdays with Dorie site to see how everyone else fared! 


Tuesday, May 20, 2008

TWD: Madeleines


This week's Tuesdays with Dorie recipe was a lot of fun.  Tara of Smells Like Home chose Traditional Madeleines.  Since madeleines require a special pan, Laurie also gave everyone the option to make a previous selection instead.  Since I can't seem to pass up an opportunity to buy new stuff for my kitchen, I decided to go with the madeleines.  

I did some checking around, since I've seen pans at a number of places, and some of them were rather expensive.  Williams-Sonoma had one on their website, and on Thursday I had a chance to stop by the store in Austin to see what they had in stock.  They had the non-stick pans for standard size madeleines and minis, but they also had regular (not non-stick) pans that were only $14, rather than $22.  I decided to be brave and go with the regular pan.  I couldn't decide between the two sizes, so I bought both.  =)

This is one of the few times when I've actually gotten an early start on the recipe of the week. The first batch that I made was according to the recipe, flavored with lemon zest.  It was a learning experience, which is a nice way of saying I had a number of problems.  Mixing up the batter was easy; getting the madeleines to turn out the way they're supposed to was the hard part.  For one thing, I overfilled the molds.  I think that was what caused the resulting cookies (are they cookies? cakes? something else?) to be flat, instead of having the characteristic bump on the back.  I also found that putting the pan on a sheet pan (per Dorie's directions) kept the madeleines from browning very well, and they really wanted to stick to the pan (despite my generous use of Pam for Baking).  Overall, while the results were fairly tasty, I wasn't very happy with how they turned out.   

So naturally, I decided to make them again.  =)  The second time, I played around with the flavoring a bit.  I left out the lemon zest and reduced the vanilla to half a teaspoon.  Then I added some spices--1/4 teaspoon cinnamon plus a bit of ginger and freshly grated nutmeg.  I whisked them into the melted butter while it was still warm.  I really like the way the madeleines tasted.  As far as baking, I did a test run of just half a dozen regular sized cookies.  I made sure not to overfill the molds this time, and put the pan directly on the oven rack to bake. The results were much better.  I got nice browning, good definition on the shells, and at least rounded backs this time.  


Jamie and I enjoyed those Saturday night.  On Sunday morning, I used the rest of the batter to make a batch of minis.  Brianna and Gillian helped me eat them for breakfast while we were waiting on the cinnamon rolls.  Brianna was quite intrigued by the name--her middle name is Madeline.  I loved the contrast of the crispy edges and soft middles.  Gillian just ate hers as quickly as possible and immediately asked for "Mo?" 

You can check out the recipe at the Borders recipe file.  Also be sure to check out the blogroll for more madeleines and to see what other past recipes people chose to bake this week!


Sunday, May 18, 2008

Breakfast for lunch...


...again.  I've got to quit trying out new recipes on Sunday mornings.  Actually, that should read "time-consuming new recipes."  New muffins or pancakes aren't the problem.  It's the yeast breads that are messing with my timeline.  =)  A couple weeks ago it was doughnuts.  Today it was cinnamon rolls.  

You'd think after my comment last week about running out of room on my kitchen bookshelf again, I would have known better than to open my Borders email.  But how could I pass up a 40% off coupon, especially since I needed to spend my Borders bucks by the end of the month? Since Jamie got me Pure Dessert for Mother's Day, I decided to pick up something else that I've been eyeing for a while...  Peter Reinhart's The Bread Baker's Apprentice.  I've seen recipes on a number of blogs.  There was also a great article by him in my last issue of Fine Cooking that gave me some pointers that improved my pizza dough.

I'm still working my way through the beginning part of the book, which talks about the whole bread-baking process, but I decided to thumb through the recipe section to see what I might want to make first.  The cinnamon rolls caught my eye.  It wasn't until I was reading through the whole recipe that I realized why.  I've seen them before, here.  This was the recipe chosen by Marce of Pip in the City as the Daring Bakers challenge for September 2007.  (You can check out her post or Peabody's for the full recipe.)  

I did make a couple changes.  I left out the lemon extract/lemon zest and added a teaspoon of vanilla instead.  I didn't end up using all of the cinnamon sugar mixture, either.  Since I love raisins in my cinnamon rolls, I used the flambéd raisins from Dorie's Brioche Raisin Snails in the filling.  But since Brianna doesn't like raisins in her baked goods, I only sprinkled the raisins over about three-fourths of the dough.  I used mini chocolate chips for the rest.

The result?  Brianna, Gillian and I all loved them.  And as a bonus, now my house smells fantastic... =)  I'll definitely be making these again, once I figure out how to get them done in time for actual breakfast (without getting up at 4am!).


Tuesday, May 13, 2008

LiveSTRONG with a taste of Dorie


This week's Tuesdays with Dorie recipe is Florida Pie, selected by Dianne of Dianne's Dishes.  I love pie, but I had one problem with this particular recipe.  It has coconut.  Not a little coconut, that I could easily leave out (as in Bill's Big Carrot Cake).  Lots of coconut.  And I really can't stand coconut.  I thought about just trying to make the pie without the coconut, but it seemed like such an integral part of the recipe--after all, it's supposed to be Florida Pie, not Just Your Average Key Lime Pie.  So sadly, I'm going to pass on TWD this week.  (But I'm excited about next week--another excuse to buy new bakeware!)  Go take a look at the Tuesdays with Dorie blogroll and check out all the fabulous pies!

Instead, I would like to highlight another recipe from Baking From My Home to Yours that I made a while back.  Click here for my post about Dorie's Lemon Sablés, which was my contribution to the LiveSTRONG with a Taste of Yellow event hosted by Barbara at Winos and Foodies.  While you're at it, head over to her blog to check out the round-up for LiveSTRONG Day 2008, which is today, May 13th. 

Sunday, May 11, 2008

Mother's Day


First off, happy Mother's Day to all the mothers out there! I wasn't sure how today was going to be. It's been less than two months since my mom died, and I knew that I was going to have a hard time today. It wasn't great, but it wasn't as bad as I feared. Jamie and Brianna made muffins for breakfast and spaghetti & meatballs for dinner, with minimal assistance from me. =)


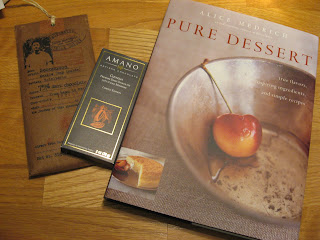
And I got some cool presents! It looks like I'm going to have to rearrange my bookshelf in the kitchen again. I love my copy of Alice Medrich's Bittersweet, and I've been wanting a copy of her new Pure Dessert since it came out. And I've mentioned before how my husband likes to find interesting chocolates for me to try, so I wasn't surprised to receive some new ones. One of them is from Askinosie, which Laurie has been talking about.


And finally, my kiddos actually cooperated for some pictures.  It can be hard to get them to sit still if I'm not feeding them. =)


Tuesday, May 6, 2008

TWD: Peanut Butter Torte


When I was in grade school, my mom would pack my lunch.  That is, up until I started to complain about what was in it.  At that point, she told me to do it myself.  =)  My chief complaint?  I don't like peanut butter and jelly sandwiches.  I like jelly, and I don't mind peanut butter, but I absolutely do not like them together.  Weird, huh?  If I ended up with a PB&J somehow, I'd take it apart and put the jelly pieces together and do the same with the peanut butter sides.  

Honestly, I'm not that big a fan of peanut butter at all.  But as I got older, I discovered a different combination--peanut butter and chocolate.  Now if there's chocolate involved, how could it be bad?  My favorite "candy bar" is Reese's peanut butter cups.  And actually, what I like even better is the Reese's peanut butter eggs that you get around Easter.  They have a better ratio of peanut butter to chocolate.  In fact, I'm pretty sure I still have some stashed away where my kiddos won't find them.  It's not too big a worry--Brianna really doesn't like peanut butter that much.  With all the worries about peanut allergies these days, they don't allow it at daycare, so she really hasn't had it very often.  The few times I've tried to give her a peanut butter and jelly sandwich, she's pushed it away.  Or maybe she's just like me and doesn't like the combination.  =)

Anyway, all this talk of peanut butter (and chocolate!) leads us to this week's Tuesdays with Dorie recipe, Peanut Butter Torte, selected by Elizabeth of Ugg Smell Food.  This one looked truly decadent, with a filling of peanut butter, cream cheese and cream, so I knew I didn't want to make a full-size torte.  Naturally, I used that as an excuse to acquire another new piece of bakeware.  I headed down to Sur la Table (one of my favorite places to browse--I could go pretty crazy in there if I had more money to spend) and picked up a 7-inch springform pan.  It was actually pretty inexpensive.  Armed with my new pan, I planned to make half the recipe.

I had to make another special purchase for this recipe.  Oreos.  I almost never buy cookies, because I prefer to make my own.  Plus Oreos are dangerous to have around.  After taking out enough of them for the crust (and eating two or three), I froze the rest to remove temptation.  After reading some of the comments on this week's P&Q, I figured I'd need more than 12 for a good crust, so I used 16, and about 3 tablespoons of melted butter.  That worked quite well. 

While the crust was cooling, I started prepping ingredients for the filling.  I mixed together the mini chips, chopped peanuts, epresso powder and cinnamon.  Somehow I totally missed the nutmeg in the ingredients list!  I didn't want too many nuts in my filling, so I only did the 1/4 cup for the "crunch."  All was going well until I started on the mousse.  I didn't feel like pulling out my stand mixer for only half the recipe, so I decided to mix the filling by hand.  I measured out my cup of cream and started whipping it.  But some interaction of my metal whisk and metal bowl (stainless steel, shouldn't have been a problem) caused weird gray bits to show up in my whipped cream.  I tried to figure out a way to strain them out, but finally gave up and started over.  At this point, I realized I only had 3/4 cup of cream left in the fridge, but I decided to wing it.  =)  I also only had 5 ounces of cream cheese, rather than 6.  Oops.  I went ahead and used the full 3/4 cup of peanut butter, so my filling just ended up extra peanut-buttery.  No problem!

I put about three-fourths of my mousse into the prepared crust.  Then to dress things up a bit, I piped the rest on top in stars (sort of).  I had actually decided to pass on the ganache topping, which was good since I was out of cream!  I prefer milk chocolate with peanut butter, and was going to make a milk chocolate ganache instead of a dark one, but forgot to buy more milk chocolate when I was shopping.  So I just topped my mousse with more mini chips.

After all was said and done, Jamie and I got to try the finished product Monday night.  It was extremely tasty, but not something I could eat a lot of in one sitting.  I'll have to wait until this evening to see if Brianna likes it better than PB&J.  =)


Peanut Butter Torte
(adapted from Baking From My Home to Yours by Dorie Greenspan)


16 Oreo cookies, finely crumbed or ground in a food processor
3 tablespoons unsalted butter, melted and cooled

1/4 cup finely chopped salted peanuts
1 teaspoon sugar
1/4 teaspoon instant espresso powder
1/8 teaspoon ground cinnamon
1/4 cup mini chocolate chips
Small pinch of salt

3/4 cup heavy cream
2 tablespoons + 1/2 cup (2 ounces) confectioners’ sugar
5 ounces cream cheese, at room temperature
3/4 cup salted peanut butter (I used smooth Jif)
1 tablespoon whole milk

additional mini chocolate chips for garnish


Getting ready: Center a rack in the oven and preheat the oven to 350°F. Butter a 7-inch springform pan and place it on a baking sheet. (I skipped buttering the pan and didn't have a problem.  I also wrapped the bottom of my spring-form pan in non-stick foil before putting the ring on.  It makes for a tighter seal between the bottom and sides and makes it easier to get pieces of the torte out.)

Put the Oreo crumbs, melted butter and salt in another small bowl and stir with a fork just until crumbs are moistened. (I just added the butter to the crumbs in my food processor bowl and pulsed it a few more times.)  Press the crumbs evenly over the bottom and up the sides of the spring-form pan (they should go up about 2 inches on the sides). Freeze the crust for 10 minutes.

Bake the crust for 10 minutes, then transfer it to a rack and let it cool completely before filling.

Toss the chopped peanuts, the sugar, espresso powder, cinnamon, and chocolate chips together in a small bowl. Set aside.

Working with a stand mixer fitted with the whisk attachment or with a hand mixer in a large bowl (I just used a bowl and a whisk), whip the cream until it holds medium peaks. Beat in 2 tablespoons of the confectioners’ sugar and whip until the cream holds medium-firm peaks. Scrape the cream into a bowl and refrigerate until needed.

Wipe out (do not wash) the bowl, fit the stand mixer with the paddle attachment if you have one, or continue with the hand mixer, and beat the cream cheese with the remaining 1/2 cup confectioners’ sugar on medium speed until the cream cheese is satiny smooth. Beat in the peanut butter and the milk. (Again, I just did this by hand.)

Using a large rubber spatula, gently stir in about one quarter of the whipped cream, just to lighten the mousse. Still working with the spatula, stir in the crunchy peanut mixture, then gingerly fold in the remaining whipped cream.

Scrape the mousse into the crust, mounding and smoothing the top (I put about three-fourths of the mousse in the crust, and then piped the rest around the top).  Scatter mini chips on top of the mousse.  Refrigerate for at least 4 hours, or overnight; cover with plastic wrap as soon as the mousse firms.

When the ganache is firm, remove the sides of the Springform pan; it’s easiest to warm the pan with a hairdryer, and then remove the sides, but you can also wrap a kitchen towel damped with hot water around the pan and leave it there for 10 seconds. Refrigerate until ready to serve.

Sunday, May 4, 2008

Sunday morning tradition


I don't think I've mentioned before that I have three younger sisters.  When we were kids, my dad would take us to church on Sunday morning (my mom didn't go).  Afterwards, we would often stop for a dozen doughnuts.  We each got to pick two, plus two each for Mom and Dad. We would argue over which one of us got to go in with Dad while the others waited in the car. It was quite a challenge to remember a dozen different doughnuts, since of course none of us liked the same ones.  Dad would never have been able to keep track of them all on his own.  =)

These days, I don't eat doughnuts very often.  I just don't have the same tolerance for sugary sweet treats.  (Chocolate, yes; sugar, no.)  I love baking something interesting for breakfast on the weekends, but I've never tried my hand at doughnuts.  I thought about it, back in February when I saw the Time to Make the Doughnuts event hosted by Culinary Concoctions by Peabody and Tartelette.  But I was too busy making bagels.  =)  For some reason, I've been thinking about it again lately.  So today I asked Brianna if she'd like cinnamon rolls or doughnuts for breakfast, and she immediately said doughnuts.  

The only bad thing was that it was after 8am when I started.  I did have a recipe in mind, from Sherry Yard's Desserts by the Yard.  I knew that it would take quite a while, since the dough had to rise and then the cut doughnuts had to rise again.  But I thought it wouldn't be too bad. Unfortunately, I was wrong.  The dough turned out to be a huge pain to work with--very sticky. Freezing the dough before cutting (as directed) didn't help enough.  I finally just ended up using a bunch more flour on the countertop to keep it from sticking while I cut out the shapes.  Then I had problems with the frying.  We more or less ended up eating doughnuts for lunch.  =)  At least they tasted pretty good.  


I know that many things are tough the first time you make them.  I definitely learned a few things from the experience.  The next time I try these, I'll start the dough the night before and let it rise in the fridge overnight.  I think the cold dough will be easier to work with (similar to brioche).  I still have half the dough in my freezer (already cut into doughnut shapes), so I think I'll try baking the rest instead of frying.  My dutch oven is huge and would have used way too much oil, so I tried to improvise with a smaller pot.  I had a really hard time regulating the temperature and the doughnuts ended up rather oily.  If I do try frying again, I think I'll try the Cooks' Illustrated suggestion of shortening instead of oil.  And I'll only fry what we'll eat right away, since even 12 hours later they aren't all that good anymore.  Oh, well--practice makes perfect, right?


Buttermilk Yeast Doughnuts
(adapted from Desserts by the Yard by Sherry Yard)

1 1/2 teaspoons instant yeast
1/2 cup (4 ounces) whole milk, heated to lukewarm
1 tablespoon granulated sugar
1/2 cup (2 1/4 ounces) unbleached all-purpose flour

1/2 cup (4 ounces) whole milk, heated to lukewarm
1 cup (8 3/4 ounces) buttermilk, heated to lukewarm
1/4 cup + 1 teaspoon granulated sugar
1/2 teaspoon freshly grated nutmeg
3 1/2 cups (15 3/4 ounces) unbleached all-purpose flour
1 1/2 teaspoons table salt
4 tablespoons (1/2 stick) unsalted butter, cut into tablespoon-sized pieces and softened

oil for frying
1 cup sugar mixed with 1 tablespoon cinnamon

In the bowl of a stand mixer, whisk together the yeast and 1/2 cup of the milk until the yeast has dissolved.  Let stand for 5 minutes, then stir in the tablespoon of sugar and 1/2 cup flour, forming a thin batter.  Let rest at room temperature until bubbles form, 20 to 30 minutes.  

Stir the other 1/2 cup milk, buttermilk, nutmeg and the remaining 1/4 cup plus 1 teaspoon sugar into the sponge.  Place the remaining 3 1/2 cups of flour and the salt on top of the sponge.  Put the bowl on the mixer fitted with the paddle attachment.  Mix on low speed for about 2 minutes, or until the dough comes together.  Scrape down the bowl and the paddle and change to the dough hook.  Increase the speed to medium and knead the dough for 5 minutes.  The mixture will be tacky.

Turn the speed down to medium-low and add the softened butter one tablespoon at a time.  Stop the mixer and scrape down the sides.  Mix for another five minutes on medium speed or until the dough is smooth.  Scrape the dough into a lightly oiled rising container.  Cover the container and set it aside for the dough to rise at room temperature until doubled in volume, 1 1/2 to 2 hours.  

Line 2 12x17-inch sheet pans with parchment paper and lightly flour the parchment. When the dough has doubled in volume, turn it out onto a lightly floured work surface, and using a rolling pin, roll it out to a 10-inch square with a thickness of 1/2 inch.  Wrap the dough in plastic wrap and place in the freezer for 20 minutes.  Using a 2 1/2 inch round cutter, cut out circles of dough and use a 1 inch cutter to cut holes in the dough circles.  Dip the cutters in flour each time to make it easier.  Place the doughnuts and holes on the parchment-lined sheet pans.  Cover with plastic wrap and let rise for 30 minutes.  


In a wide deep saucepan fitted with a deep-fry thermometer, heat 2-3 inches of oil over medium heat to 360 degrees F.   Carefully slide 3 doughnuts into the oil.  After 30 seconds, use a slotted spoon to carefully flip them over.  Brown the other side for 1 minute, then flip the doughnuts once more and cook for another 30 seconds.  Remove the doughnuts from the oil and drain them on a rack for 30 seconds.  Coat the tops of the doughnuts with the cinnamon sugar while they are still hot and wet with oil.  Repeat with the remaining doughnuts and holes. Serve immediately.  Makes about 16 doughnuts plus holes.

Thursday, May 1, 2008

Technical difficulties and TWD

I didn't realize just how much I look forward to reading people's blogs until I couldn't for a couple days.  I know that my internet provider was doing some scheduled maintenance Monday night, but my connection never came back!  I wasn't able to finally get it straightened out until last night.  Very frustrating.

Unfortunately, that is very typical of how my life has been going for the past week or so.  As result, I was not able to complete this week's Tuesdays with Dorie recipe.  I was really disappointed to miss out, since the Fluted Polenta and Ricotta Cake was chosen by Caitlin of Engineer Baker.  I absolutely love reading her blog.  At some point when life calms down a bit, I will definitely have to make this cake.  In the meantime, you can read about many wonderful versions of this cake by checking out the blogroll at Tuesdays with Dorie.